V1 to V6 Getting Started
Setting up your system
- Install Eclipse
- Install Maven Integration Plugin (check http://www.eclipse.org/m2e/)
- install Spring IDE plugin (check https://marketplace.eclipse.org/content/spring-ide)
Introducing Maven
- Maven Project contains these important folders:
- src/main/java (for core code)
- src/test/java (for unit test)
- pom.xml for adding dependencies
- when you create new Maven project you can choose one of the archetypes (predefined projects)
- You should define GroupId, ArtificatID, VersionID for your Maven Project.
Spring HelloWorld
- create Maven Project
- define Person class

- Add the following dependencies to pom.xml to use spring
- Spring-core
- Spring-beans
- Spring-context

- Add beans.xml to the project root, inside beans.xml you will define project beans, add Person bean.

- now we will create beans container and take a bean from it, in order to do that you should write the following:

- as you can see, creating beans continer happens by defining ApplicationContext, spring will open beans.xml and create the beans defined in it.
- you can get a bean by using context.getBean(BeanID)
- you dont need to write Person x = new Person(), as Spring initialize it for you.
- you should close the context at the end to avoid memeory leak, as ApplicationContext doesnt have a close() method, you should cast the context to close it
- we used FileSystemApplicationContext to open beans.xml, there are other classes that could be used, we will talk about them later.
- you can use BeanFactory instead of ApplicationContext.


What is a context
a context is an interface to the container, you take beans from the context
Class Path Context:
- instead of using FileSystemXmlApplicationContext to open the beans, you can use ClassPathXmlApplicationContext, which can open beans.xml defined in the classpath.
- for example we will move beans.xml to a Package, then we open it as follows:


V7 Constructor Arguments
Constructor Arguments

then in order to inject a bean from this class you should write this in beans.xml

we use <constructor-arg> to pass a value to the constructor, there is no need to specify the type, the name is the constructor argument name.
V8 Setting Bean Properties
Setting Bean Properties
if you have a class like the one below, the class has a property which is taxId, in order to inject the value taxId from beans.xml, you should define a set method (keep the camel convention)

Now you can inject this value like this in beans.xml

we use <property> tag for that.


The difference between bean ID and bean name
when you define a bean you can set an id and name, the id and name are the same in everything, however you cannot use special characters in id like # for example
in addition you can define aliases for a bean, this can be done only by using the name field but not the id field
<bean id="x" name="x,y,z"/>
with this you can use any name to get the bean (x or y or z).
V9 Dependency Injection
Dependency Injection
As we mentioned before, we can do Dependency Injection either by <constractor-arg> or <property>, so either by the constructor or by the set method.
Here we will talk about how we inject a bean to another bean
1- we have an address class.

2- now we define a person class which has an address.

3- now in beans.xml we define Address bean and Person bean, we inject address in person by using ref attribute.

V10 Bean Scope & Life cycle
when you create a bean in beans.xml, you can add a Scope attribute which can take one of these 4 values: prototype, session, request, singleton
<bean id="person" class="com.caveofprogramming.spring.test.Person" scope="prototype">
the default is singleton which means whenever you use context.getBean(..) it will return the same bean (it will not create a new one).
Person person1 = (Person)context.getBean("person");
Person person2 = (Person)context.getBean("person");
if you want to change this behaviour and let spring returns a new bean for each context.getBean(..) then you should use the prototype scope.
another one is creating a bean for each session or a bean for each request.
we will talk about the other scope types later.
Creating a bean for each Session
when we create a bean for each session, we will have a problem, how can we inject a bean and the session is still not created.
in this case we use something called, scoped-proxy, which means we create a proxy to deal with
<bean id="...." class="...." scope="session"/>
<aop:scoped-proxy/>
this will use CGLIB for the proxy
Bean life Cycle
the bean has a life cycle, you can determine what part of the life cycle the bean should go, you can do that by implementing interfaces, for example if the bean implement BeanAwareName --> spring will make a call to the setBeanName() method.
implementing BeanPostProcessor --> PostProcessor() will be called
V11 Init and Destroy Methods
in general when a bean is created, the constructor will be called then the properties will be set. In spring, you can define an init-method which will be called after the bean constructor is called and the properties are set.
<bean id="person" class="Person" init-method="onCreate">
where onCreate is the method name (sure the name is not important).
in addition, you can define a destroy method, which will be called when the bean is destroyed
<bean id="person" class="Person" init-method="onCreate" destroy-method="onDestroy">
Note: destroy-method will not be called automatically if the bean's scope is prototype, the bean's scope should be singleton (which is the default value) in order to be called.
In addition, you can define the init method and the destroy method to be global for all beans by using default-init-method and default-destroy-method:

V12 Factory Beans and Method
in this video we will initiate the bean by using a factory method.


to do that, you should define a factory method in the class.

as you can see we defined getInstance as a factoryMethod which returns a person object, sure the factory method must be static.
now in the beans.xml.

in order to use the factory method you use factory-method="getInstance", and the parameters that you want to pass to getInstance (in this case the id and the name) should be defined as <constructor-arg>
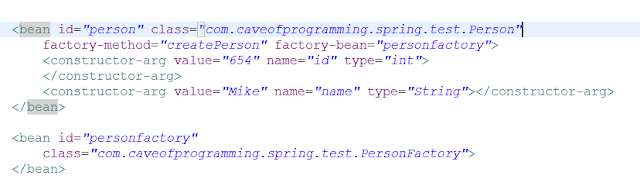
Factory Bean
in addition you can define a Factory class, we will define a PersonFactory class,

and now in order to use this class to create a bean, you write

as you can see you should
1- define a PersonFactory bean
2- use factory-method and factory-bean attributes, in the Person bean.
Note: lets say that you have multiple beans in beans.xml, all singleton beans will be initiated when you run:
ApplicationContext context = new ClassPathXmlApplicationContext("beans.xml");
and not when you run (Person)context.getBean("person");
V13: The P NameSpace
we learned before that if you want to set a property you use the <property> tag:
<bean id="address" class="com.caveofprogramming.spring.test.Address">
<property name="street" value="1 Church Lane"></property>
<property name="postcode" value="9876"></property>
</bean>
another way of doing that is to use P NameSpace.

so firstly you import the namespace
xmlns:p="http://www.springframework.org/schema/p"
and then you use p:propertyName (e.g. p:street).
V14: Setting List Properties
lets say you have this class

as you can see it takes List as a constructor argument,
in order to pass list as a constructor argument (or as property) you write
<bean id="basket" class="FruitBasket">
<constructor-arg value="John's basket"></constructor-arg>
<constructor-arg>
<list>
<value>apple</value>
<value>banana</value>
<value>orange</value>
<value>kiwi</value>
<value>pear</value>
<value>orange</value>
</list>
</constructor-arg>
</bean>
NOTE: as you can see we use <list> to pass a list as argument, but actually we can use <set> as well, however when we use <set> spring will eliminate duplicate values (like orange in the example above.
V15 List of Beans
lets say that we have the following class
public class Jungle {
private Animal largest;
private List<Animal> animals;
public void setAnimals(List<Animal> animals) {
this.animals = animals;
}
.....
}
as you can see setAnimals takes List<Animal> as input, where Animal is another class defined as follows:
public class Animal {
private String name;
private String type;
...
}
lets say that you have the following Animal beans
<bean id="lion" class="com.caveofprogramming.spring.test.Animal">
<property name="name" value="Igor"></property>
<property name="type" value="lion"></property>
</bean>
<bean id="elephant" class="com.caveofprogramming.spring.test.Animal">
<property name="name" value="Richard"></property>
<property name="type" value="elephant"></property>
</bean>
<bean id="snake" class="com.caveofprogramming.spring.test.Animal">
<property name="name" value="Bob"></property>
<property name="type" value="snake"></property>
</bean>
now in order to pass List<Animal> to a Jungle bean you write:
<bean id="jungle" class="com.caveofprogramming.spring.test.Jungle">
<property name="animals">
<list>
<ref bean="snake" />
<ref bean="elephant" />
<ref bean="lion" />
</list>
</property>
</bean>
as you see you use the ref tag to add a bean to the list.
V16 Inner Beans
as we saw in all our previous examples, when you reference a bean you do like this
<bean id="jungle" class="com.caveofprogramming.spring.test.Jungle">
<property name="largest" ref="lion"></property>
</bean>
<bean id="lion" class="com.caveofprogramming.spring.test.Animal">
<property name="name" value="Igor"></property>
<property name="type" value="lion"></property>
</bean>
so we defined a lion bean, and we are referring to this bean in the jungle bean.
the lion bean can be referred to in any beans, however sometimes you want the bean to be used only in one location, in this case you can define that bean as an inner bean as follows:
<bean id="jungle" class="com.caveofprogramming.spring.test.Jungle">
<property name="largest" >
<bean id="lion" class="com.caveofprogramming.spring.test.Animal">
<property name="name" value="Igor"></property>
<property name="type" value="lion"></property>
</bean>
</property>
</bean>
<bean id="jungle" class="com.caveofprogramming.spring.test.Jungle">
<property name="largest" ref="lion"></property>
</bean>
<bean id="lion" class="com.caveofprogramming.spring.test.Animal">
<property name="name" value="Igor"></property>
<property name="type" value="lion"></property>
</bean>
so we defined a lion bean, and we are referring to this bean in the jungle bean.
the lion bean can be referred to in any beans, however sometimes you want the bean to be used only in one location, in this case you can define that bean as an inner bean as follows:
<bean id="jungle" class="com.caveofprogramming.spring.test.Jungle">
<property name="largest" >
<bean id="lion" class="com.caveofprogramming.spring.test.Animal">
<property name="name" value="Igor"></property>
<property name="type" value="lion"></property>
</bean>
</property>
</bean>
as you can see the lion bean is defined now inside <property> which makes it an inner bean, lion bean is used just to set this property and you cannot refer to it from any other place.
V17 Property Maps
lets say we have the following class
public class Jungle {
private Map<String, String> foods = new HashMap<String, String>();
public void setFoods(Map<String, String> foods) {
this.foods = foods;
}
.....
}
as you can see setFoods takes Map<String,String> as input
in order to set this value we write:
<bean id="jungle"class="com.caveofprogramming.spring.test.Jungle">
<property name="foods">
<props>
<prop key="gorilla">banana</prop>
<prop key="panda">bamboo</prop>
<prop key="snake">eggs</prop>
</props>
</property>
</bean>
as you can see we use <props> in order to set Map value.
V18 Arbitrary Map as Bean Properties
lets say we have the following class:
public class Jungle {
private Map<String, Animal> animals = new HashMap<String, Animal>();
public void setAnimals(Map<String, Animal> animals) {
this.animals = animals;
}
.....
}
as you can see setAnimals has Map<String,Animal> as input, where Animal is another class.
in order to set this value you write:
<bean id="lion" class="com.caveofprogramming.spring.test.Animal">
<property name="name" value="Igor"></property>
<property name="type" value="lion"></property>
</bean>
<bean id="elephant" class="com.caveofprogramming.spring.test.Animal">
<property name="name" value="Richard"></property>
<property name="type" value="elephant"></property>
</bean>
<bean id="snake" class="com.caveofprogramming.spring.test.Animal">
<property name="name" value="Bob"></property>
<property name="type" value="snake"></property>
</bean>
<bean id="jungle" class="com.caveofprogramming.spring.test.Jungle">
<property name="animals">
<map>
<entry key="lion" value-ref="lion"></entry>
<entry key="elephant" value-ref="elephant"></entry>
<entry key="snake" value-ref="snake"></entry>
</map>
</property>
</bean>
as you can see we use <map> in order to set this value, in addition we use value-ref to reference a bean ( you can also use key-ref if the key is a bean).
remember that in the previous tutorial we used <props> to set a Map<String,String> value.
V19-V23 Autowiring
as we know, to wire the beans together we were using <constructor-arg> or <property>.
there are other ways to wire beans:
1- Autowire ByType
lets say we have the following:
public interface LogWriter {...}
public class FileWriter implements LogWriter {...}
public class ConsoleWriter implements LogWriter {...}
public class Logger {
private ConsoleWriter consoleWriter;
private FileWriter fileWriter;
...
}
so in beans.xml, we can have the following:
<bean id="logger" class="Logger" autowire="byType"></bean>
<bean id="consolewriter" class="ConsoleWriter"></bean>
<bean id="filewriter" class="FileWriter"></bean>
autowire byType means that Spring will check what TYPE of beans that needed from this class are, and will autowire them (in this case logger needs a bean from the type ConsoleWriter and FileWriter).
in case we have something like this in beans.xml:
<bean id="logger" class="Logger" autowire="byType"></bean>
<bean id="consolewriter" class="ConsoleWriter"></bean>
<bean id="consolewriter1" class="ConsoleWriter"></bean>
<bean id="filewriter" class="FileWriter"></bean>
we have autowire byType, however we have 2 beans of type ConsoleWriter, Spring will throw an exception because it cannot know which bean to wire.
another thing, lets say that Logger class is defined like this:
public class Logger {
private LogWriter writer;
...
}
now the Logger class has a property of type LogWriter (the interface).
and beans.xml looks like this:
<bean id="logger" class="Logger" autowire="byType"></bean>
<bean id="consolewriter" class="ConsoleWriter"></bean>
<bean id="filewriter" class="FileWriter"></bean>
this will throw an exception, because both ConsoleWriter and FileWriter implement the LogWriter Interface, Spring doesnt know which one to AutoWire.
2- Auotwire byName
the wiring will happen based on the setMethod name (sure without the "set"),
public class Logger {
private ConsoleWriter consoleWriter;
private FileWriter fileWriter;
public void setXxxWriter(ConsoleWriter writer) {...}
public void setFileWriter(FileWriter fileWriter) {...}
}
in beans.xml you can write:
<bean id="logger" class="Logger" autowire="byName"></bean>
<bean id="xxxWriter" class="ConsoleWriter"></bean>
<bean id="fileWriter" class="FileWriter"></bean>
as you can see xxxWriter matches with setXxxWriter, and fileWriter matches with setFileWriter.
3-Autowire byConstructor
in this case Spring will check the constructor requirement, for example lets say we have this constructor in Logger:
public Logger(ConsoleWriter x)
the bean definition
<bean id="logger" class="Logger" autowire="byConstructor"></bean>
will make spring checks the TYPEs that are required by the constructor, in this case we need a bean of type ConsoleWriter, Spring will search for a bean of this type.
Spring Default Autowiring:
you can define a default auto wiring for all beans by writing:
<beans default-autowire="byName" >
<bean ....>
<bean ...>
</beans>
in addition you can use default-autowire-candidates to provide a pattern for bean names that can be used for autowiring. for example
<beans default-autowire="byName" default-autowire-candidates="consoleWriter,fileWriter" >
in this case only consoleWriter and fileWriter beans will be used for wiring, this is a way to solve bean wiring ambiguity.
or you can define it as a regular expression something like
<beans default-autowire="byName" default-autowire-candidates="*Writer" >
Removing Autowire Ambiguity
lets say we have this
<bean id="logger" class="Logger" autowire="byType"></bean>
<bean id="consolewriter" class="ConsoleWriter"></bean>
<bean id="consolewriter1" class="ConsoleWriter"></bean>
<bean id="filewriter" class="FileWriter"></bean>
as we mentioned this will throw an exception because we have 2 beans of type ConsoleWriter and spring cannot know which one to use,
you can solve this issue by autowire-candiate="false"
<bean id="logger" class="Logger" autowire="byType"></bean>
<bean id="consolewriter" autowire-candidate="false" class="ConsoleWriter"></bean>
<bean id="consolewriter1" class="ConsoleWriter"></bean>
<bean id="filewriter" class="FileWriter"></bean>
Spring will know now that this bean cannot be used for autowiring and will use the other bean.
another way to fix it is by using primary="true"
<bean id="logger" class="Logger" autowire="byType"></bean>
<bean id="consolewriter" primary="true" class="ConsoleWriter"></bean>
<bean id="consolewriter1" class="ConsoleWriter"></bean>
<bean id="filewriter" class="FileWriter"></bean>
this will tell spring that i am the one to be used for autowiring
V24-V32 Wiring with Annotations
V24 Adding Support for Annotation-Based Wiring
in order to be able to use use annotations for wiring you should add the follwoing to beans.xml
1- context namespace
2- <context:annotation-config> tag
<beans xmlns:context="http://www.springframework.org/schema/context" >
in order to be able to use use annotations for wiring you should add the follwoing to beans.xml
1- context namespace
2- <context:annotation-config> tag
<beans xmlns:context="http://www.springframework.org/schema/context" >
<context:annotation-config></context:annotation-config>
.....
</beans>
V25 The "Autowired" Annotation
after we added the context namespace (in V24), now you define your beans in beans.xml as we normally do
<bean id="logger" class="Logger"></bean>
<bean id="consoleWriter" class="ConsoleWriter"></bean>
<bean id="fileWriter" class="FileWriter"></bean>
now you can do the wiring by using @Autowired, you can use @Autowired with constructor, setMethod and properties
public class Logger {
//wiring properties
@Autowired
private ConsoleWriter consoleWriter;
private FileWriter fileWriter;
//wiring constructor
@Autowired
public Logger(ConsoleWriter consoleWriter, FileWriter fileWriter) {
this.consoleWriter = consoleWriter;
this.fileWriter = fileWriter;
}
//wiring set method
@Autowired
public void setConsoleWriter(ConsoleWriter writer) {
this.consoleWriter = writer;
}
........
}
V26 Optional Beans
lets say that you have this class
public class Logger {
private FileWriter fileWriter;
@Autowired
public Logger(FileWriter fileWriter) {
this.fileWriter = fileWriter;
}
}
this class needs a FileWriter bean, and we dont have any FileWriter bean in beans.xml
if you run the program you will get an exception because Spring cannot find a FileWriter bean to wire.
you can fix that by writing @Autowired(required=false) this will tell spring that even if you cannot find the required bean continue and consider the value as null
no you should be careful as the fileWriter value is null, so you should write something like
if (fileWriter != null) {doSomething()};
V27 Using Qualifiers
lets say we have this class
public class Logger {
private ConsoleWriter consoleWriter;
@Autowired
public void setConsoleWriter(ConsoleWriter writer) {
this.consoleWriter = writer;
}
}
and in beans.xml we have 2 FileWriter beans
<bean id="consoleWriter" class="ConsoleWriter"></bean>
<bean id="squirrel" class="ConsoleWriter"></bean>
so now we have an ambiguity and spring will throw exception, to fix this issue you can use Qualifier.
1- you add a qualifier tag to the bean
2- you use @Qualifier
in beans.xml
<bean id="consoleWriter" class="ConsoleWriter"> <qualifier value="toconsole"></qualifier></bean>
<bean id="squirrel" class="ConsoleWriter"></bean>
and in Logger class
@Autowired
@Qualifier("toconsole")
public void setConsoleWriter(ConsoleWriter writer) {
this.consoleWriter = writer;
}
so by that i am telling Spring to wire the bean with a qualifier tag "toconsole"
another scenario is if you have super class ambiguaity like this:
public class ConsoleWriter implements LogWriter {...}
public class FileWriter implements LogWriter {...}
public class Logger {
private LogWriter writer;
@Autowired
public Logger(LogWriter writer) {
this.writer= writer;
}
}
as you can see we have ConsoleWriter and FileWriter implement LogWriter, and Logger has a LogWriter property.
now in beans.xml we have
<bean id="consoleWriter" class="ConsoleWriter"></bean>
<bean id="fileWriter" class="FileWriter"></bean>
Spring will throw an exception because of the ambiguty, it cannot decide which beans to wire.
to fix this issue you can use @Qualifier in the required class and in Logger class like this
@Qualifier("filewriter")
public class FileWriter implements LogWriter {...}
public class Logger {
private LogWriter writer;
@Autowired
@Qualifier("filewriter")
public Logger(LogWriter writer) {
this.writer= writer;
}
}
so we marked the class as filewriter, and we used it in the Logger.
V28 The Resource Annotation
we used @Autowired in the previous videos, there is another way to do wiring which is @Resource and to solve ambiguity when you use @Resource you write @Resource(name="TheIDofTheBean"
public class Logger {
private LogWriter writer;
@Resource(name="filewriter")
public Logger(LogWriter writer) {
this.writer= writer;
}
}
<bean id="fileWriter" class="FileWriter"></bean>
V29 Init and Destroy Methods
we saw before how to define Init and Destroy methods in beans.xml, you can use @PostConstruct & @PreDestroy to define by taging
V30 The Inject Annotation
in previous videos we talked about @Autowire and @Resource for wiring, there is another way which is @Inject to solve ambiguity with @Inject you should use @Name(value="ID")
public class Logger {
private LogWriter writer;
@Inject
@Name(value="fileWriter")
public Logger(LogWriter writer) {
this.writer= writer;
}
}
<bean id="fileWriter" class="FileWriter"></bean>
V31 Automatic Beans Discovery
currently we are defining beans in beans.xml, you can use annotation to define beans, in order to do that
1- you need the context interface
2- use <context:component-scan>
3- use @Component
<beans xmlns:context="http://www.springframework.org/schema/context" >
<context:annotation-config></context:annotation-config>
<context:component-scan base-package="com.caveofprogramming.spring.test"></context:component-scan>
as you can see in component-scan we define the package that Spring should scan in order to find the beans
now you writ:
@Component
public class Logger {...}
now Logger is a bean, and sure you can write @Component("SOMEID") which give an id to the component.
V32 Setting Property Value
you can inject property value like this
@Inject
public void setID(@Value("10") int id) {...}
V33 - V35 Spring Expression Language(SPEL)
V33 Introducing SPEL
spring SPEL allows you to write expresssions of this style #{...}
<property name="..." value="#{5+6}"/>
or you can call a method
<bean id="A" ..../>
<property name="..." value="#{A.getText()}"/>
there another thing which is called safe expression, lets say you wanna write
#{A.getText().toString()}
however getText() may return null, which will lead to null pointer expression, to write a safe expression you can write
#{A.getText()?.toString()}
so the question mark after getText() means that if the return value from getText() is null dont call what is after the question mark.
V34 using SPEL with Annotation
so we saw in the previous video how to use SPEL in beans.xml, you can also use it with annotation,
@Autowired
public void setProperty(@Value (#{....}) int x)
V35 Some useful SPEL operator
there are different SPEL syntax, check online for that, one example is to initialize a class like this
#{new java.text.DateFormat()}
V36 - V49 Working with Databases
V36 Creating Database with MySQL
this is just a video about installing MySQL workbench and creating a table
V37 Using Property File
in this video we create jdbc.property file and add the connection information in it.
to add a property file and read it from spring you can do the following
1- create a package like com.project.prop
2- create a file JDBC.properties in the package.
3- add the connection information in JDBC.properties
jdbc.username=hnj
jdbc.pass=judge
4- now in beans.xml you should add the context schema
<beans xmlns:context="http://www.springframework.org/schema/context">
5- add also property-placeholder
<context:property-placeholder location="com.project.prop" />
by that spring knows from where to read the properties
6- now you can read the proerty file infomation by using ${jdbc.username}
<bean ...>
<property name="userName" value="${jdbc.username}"/>
</bean>
7- or you can
@Autowired
public void setUserName(@Value("${jdbc.username}") String userName) {}
V38 Implementing the DAO Pattern
in this video we are doing some preparation,
1- crate OFFER db table with the fields email,ID,text
2- create Offer class


now we can use the JdbcTemplate to create queries.
V42 Querying the Database
one of the important method in JdbcTemplate is query which is used to run an sql query.
jdbcTemplate.query("sql statment", RowMapper)
the first parameter is the sql query, the second parameter is used to map the ResultSet returned to an Object, usually we use an anonymous class to do that
 you can see how we define an anonymous class to implement the mapRow function from RowMapper
V43 Database Exception
Spring wrapped the database exceptions and gave us more detailed exceptions, the top class is DataAccessException alot of detailed classes inheret from this class.
Spring database exceptions are alos unchecked exceptions, so you are not forced to catch them.
V44 Named Parameters
in order to define a named query you should use NamedParameterJdbcTemplate, you set the parameters value using MapSqlParameterSource

as you can see the named parameter is defined as :id in the sql statement.
V45 Update Statement
to run an update, insert or delete statement you should use the function update() not query()
 the update() function return the number of affected rows.
V46 Getting Placeholder Values From Beans
in this video we run an insert statment, as we mentioned before you can use update() in order to insert a record in the database, however here in this example rather than using a MapSqlParameterSource we used BeanPropertySqlParameterSource

what BeanPropertySqlParameterSource does is mapping the named parameter to the properties of the provided object (in this case offer).
so :name will be mapped to the name property in the offer object, :text to text property and so on
V47 Adding Update to the DAO
Nothing new here he just added an update function to OfferDAO
V48 Batch Updates
you can run a batch update on a list of objects like this
 as you can see we use batchUpdate() function.
the list of named parameters should be of type SqlParameterSource.
the return value of batchUpdate() is int[] which reflects the number of affected row for each insert statement
V49 Transaction
in order to do transactions:
1- you should add a transaction manager which is a bean of type org.springframework.jdbc.datasource.DataSourceTransactionManager, this bean need a datasource so we will pass the Apache DBCP datasource
2- you need to add <tx:annotation-driven/> tag

3- now you can add the @Transactional attribute to any method that you want to run in transaction

this is just a video about installing MySQL workbench and creating a table
V37 Using Property File
in this video we create jdbc.property file and add the connection information in it.
to add a property file and read it from spring you can do the following
1- create a package like com.project.prop
2- create a file JDBC.properties in the package.
3- add the connection information in JDBC.properties
jdbc.username=hnj
jdbc.pass=judge
4- now in beans.xml you should add the context schema
<beans xmlns:context="http://www.springframework.org/schema/context">
5- add also property-placeholder
<context:property-placeholder location="com.project.prop" />
by that spring knows from where to read the properties
6- now you can read the proerty file infomation by using ${jdbc.username}
<bean ...>
<property name="userName" value="${jdbc.username}"/>
</bean>
7- or you can
@Autowired
public void setUserName(@Value("${jdbc.username}") String userName) {}
V38 Implementing the DAO Pattern
in this video we are doing some preparation,
1- crate OFFER db table with the fields email,ID,text
2- create Offer class

3- now in order to create DAO patter we define a class OfferDAO and we will add inside it the methods that deals with OFFER table:

V39 Connector Jar
simply, you need a JAR file to connect to MySQL database, you can add the required JAR file in POM.xml
also add
jdbc.driver=com.mysql.jdbc.Driver
to jdbc.properties
we will use this value later.
V40 Configuring Connection Pooling With Apache DBCP
to connect to database we will use an Apache library for that, DBCP library has functionality to open, close, connection pool and so on.
to do that
1- add the required JAR in pom.xml
2- prepare all the required information in jdbc.properties

3- the file that we are gonna use from Apache DBCP is BasicDataSource, so we will create a bean of it in beans.xml

as you can see we set the destroy-method="close"
now we are ready to connect to the database.
V41 JDBC Templates
The most used class for JDCB is JdbcTemplate we will see here how we can use this class.
1- we will use JdbcTemplate in the OfferDAO that we defined before.
2- JdbcTemplate class take an input a DataSource
3- in our case the datasource will be the Apache BasicDataSource that we defined before
here is the OfferDAO
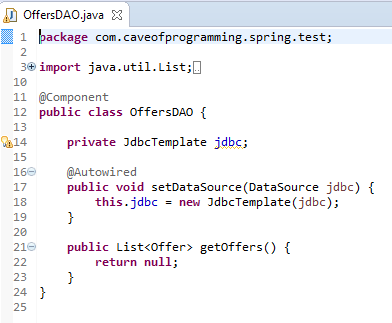
as you can see we made the class a bean by defining it as @Component.
the DataSource is Injected and used to build the JdbcTemplate, as you can see we didnt inject JdbcTemplate, we injected DataSource

V42 Querying the Database
one of the important method in JdbcTemplate is query which is used to run an sql query.
jdbcTemplate.query("sql statment", RowMapper)
the first parameter is the sql query, the second parameter is used to map the ResultSet returned to an Object, usually we use an anonymous class to do that

V43 Database Exception
Spring wrapped the database exceptions and gave us more detailed exceptions, the top class is DataAccessException alot of detailed classes inheret from this class.
Spring database exceptions are alos unchecked exceptions, so you are not forced to catch them.
V44 Named Parameters
in order to define a named query you should use NamedParameterJdbcTemplate, you set the parameters value using MapSqlParameterSource

as you can see the named parameter is defined as :id in the sql statement.
V45 Update Statement
to run an update, insert or delete statement you should use the function update() not query()

V46 Getting Placeholder Values From Beans
in this video we run an insert statment, as we mentioned before you can use update() in order to insert a record in the database, however here in this example rather than using a MapSqlParameterSource we used BeanPropertySqlParameterSource

what BeanPropertySqlParameterSource does is mapping the named parameter to the properties of the provided object (in this case offer).
so :name will be mapped to the name property in the offer object, :text to text property and so on
V47 Adding Update to the DAO
Nothing new here he just added an update function to OfferDAO
V48 Batch Updates
you can run a batch update on a list of objects like this

the list of named parameters should be of type SqlParameterSource.
the return value of batchUpdate() is int[] which reflects the number of affected row for each insert statement
V49 Transaction
in order to do transactions:
1- you should add a transaction manager which is a bean of type org.springframework.jdbc.datasource.DataSourceTransactionManager, this bean need a datasource so we will pass the Apache DBCP datasource
2- you need to add <tx:annotation-driven/> tag

3- now you can add the @Transactional attribute to any method that you want to run in transaction

V50 - V64 Web Application Basics with Spring MVC
V50 A Basic Non-Spring Web App
Nothing Important here
V51 Bringing in Maven
here we added the required JAR in the pom.xml, we need spring-webmvc and spring-web
V52 The Dispatcher Servlet
the first thing to do in order to use spring MVC is defining a Dispatcher Servlet.
we will create a Dynamic Web Project in Eclipse, then we will convert it to Maven project by right clicking on the project and selecting Convert To Maven.
now we will add the dispatcher servlet, you can right click and choose add servlet, then check Use an existing Servlet class or jsp

press browse and search for org.springframework.web.servlet.DispatcherServlet this is the DispatcherServlet class.
or you can add it directly to web.xml like this

now, this servlet is actually connected to the beans.xml file, however this file should be named as DISPLAYNAME-servlet.xml, so as the display name is offers --> the beans.xml file should be named offers-servlet.xml
As you can see in the image above, we have added this file inside WEB-INF
V53 Adding a Controller
now we will add the following controller
 as you can see we are using @Controller, and @RequestMapping
now, in order for Spring to find this controller we should add the following to the offers-servlet.xml
1- mvc context
2- <mvc:annotation-driven> tag in order to understand the @Controller and @RequestMapping and other tags.
3- and <context:componet-scan> to find all the beans

V54 View Resolver
in the previous tutorial we defined the following Controller
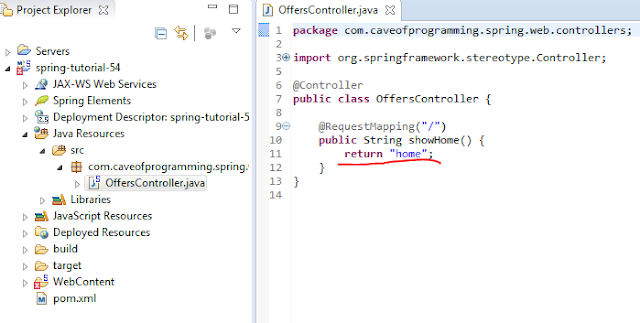 the returned value "home" is actually the name of the view (which is gonna be a JSP page in this example, but it could be VM template or anything else), what we have to do is to define a view resolver to understand that.
There are different types of View Resolvers the one we will use is InternalResourceViewResolver, this resolver is gonna be defined as a bean in offers-servlet.xml

as you can see we define a prefix and suffix, so spring will translate that to PREFIX+RETURNED STRING+SUFFIX
so when we say return "home"; it will be /WEB-INF/jsps/home.jsp
and as you can see we define the home.jsp page in WEB-INF/jsps
so now when you make a request to http://localhost:8084/offers/ (offers is the display name we defined before in web.xml)spring will run the controller and redirect you to home.jsp
V55 Adding Data to Session
now we will talk how to pass information from the controller to the view,
here we will add the data in the session, and read them in the view.
in the controller we write:

as you can see the function now takes a parameter HttpSession, and we add a value to the session by session.setAttribute()
now in the home.jsp
 you see that we used session.getAttribute()
V56 Using Spring Data Model
now we will see how to pass the value between the controller and the view correctly,
to do that we use ModelAndView like this

as you can see the function showHome() is returning ModelAndView now not a String, in addition the ModelAndView constructor getting a parameter which is the View name.
and we use model.put to put a value.
another way to do the same thing is
 Same function showHome, is returning a String which is the view name , and it takes an input which is Model
now to read the value in the View
 as you can see we use request.getAttribute()
V57 Using JSTL
This video is about the java script tagging language
 as you can see you add a taglib, then you use the tags, sure you have different taglibs you can search the internet to know more about them
V58 Setting Up a Jndi DataSource
here he talked how you can define a JNDI datasource in Tomcat then use it, he defined a Database connection,
he followed this link https://tomcat.apache.org/tomcat-7.0-doc/jndi-datasource-examples-howto.html
the steps are:
1- add a Resource to the Tomcat context.xml

2- define a resource-ref in web.xml

3- now you can lookup for this datasource in the code

V59: Bringing In the DAO Code & V60: ContextLoadListner
in the first video he brought Offer & OfferDAO classes,
the idea here that it is better to seperate your beans.xml files, which means it is better to have a beans.xml file just for the database access.
what we do here is
1- creating a package com.spring.dao and add Offer & OfferDAO classes inside
2- create a package com.spring.web.config, inside this package we will put our beans.xml files, we will add dao-context.xml file

4- it is very important to tell spring to check the dao-context.xml, in order to do this you should add ContextLoaderListner in web.xml

V61 Creating a Datasource Bean
in previous video we have created a JNDI datasource to connect to the database, we will add this datasource as bean here
in OfferDAO we have this

this datasource should be the JNDI one, and we will add it to dao-context.xml
 as you can see we use jee context and <jndi-lookup > to get the jndi
V62 Adding Service Layer
to make the real MVC, we will add a service layer, so by that the controller will call the service layer and the service layer will call the database.
we already have com.spring.web.controller where the controllers stay.
we already have com.spring.web.dao where database objects stay
we will create a new package com.spring.web.service and we will put our services objects here.
inside this package we will create the OfferService class
 As you can see the OfferService has OffersDAO which needs to be injected.
we define the OfferService with @Service which is exactly similar to @Component, but it is just a new name to specify that this is a service,
also we defined service-context.xml which will have the beans definition for services:

now the controller will use the OffersService,

V63 Adding a New Controller
nothing new here, he added a new controller.
V64 Getting URL Parameters

in order to read the URL parameters, you add @RequestParam as parameter to the RequestMapping method, sure you can add as much as you can
Nothing Important here
V51 Bringing in Maven
here we added the required JAR in the pom.xml, we need spring-webmvc and spring-web
V52 The Dispatcher Servlet
the first thing to do in order to use spring MVC is defining a Dispatcher Servlet.
we will create a Dynamic Web Project in Eclipse, then we will convert it to Maven project by right clicking on the project and selecting Convert To Maven.
now we will add the dispatcher servlet, you can right click and choose add servlet, then check Use an existing Servlet class or jsp

press browse and search for org.springframework.web.servlet.DispatcherServlet this is the DispatcherServlet class.
or you can add it directly to web.xml like this

now, this servlet is actually connected to the beans.xml file, however this file should be named as DISPLAYNAME-servlet.xml, so as the display name is offers --> the beans.xml file should be named offers-servlet.xml
As you can see in the image above, we have added this file inside WEB-INF
V53 Adding a Controller
now we will add the following controller

now, in order for Spring to find this controller we should add the following to the offers-servlet.xml
1- mvc context
2- <mvc:annotation-driven> tag in order to understand the @Controller and @RequestMapping and other tags.
3- and <context:componet-scan> to find all the beans

V54 View Resolver
in the previous tutorial we defined the following Controller

There are different types of View Resolvers the one we will use is InternalResourceViewResolver, this resolver is gonna be defined as a bean in offers-servlet.xml

as you can see we define a prefix and suffix, so spring will translate that to PREFIX+RETURNED STRING+SUFFIX
so when we say return "home"; it will be /WEB-INF/jsps/home.jsp
and as you can see we define the home.jsp page in WEB-INF/jsps
so now when you make a request to http://localhost:8084/offers/ (offers is the display name we defined before in web.xml)spring will run the controller and redirect you to home.jsp
V55 Adding Data to Session
now we will talk how to pass information from the controller to the view,
here we will add the data in the session, and read them in the view.
in the controller we write:

as you can see the function now takes a parameter HttpSession, and we add a value to the session by session.setAttribute()
now in the home.jsp

V56 Using Spring Data Model
now we will see how to pass the value between the controller and the view correctly,
to do that we use ModelAndView like this

as you can see the function showHome() is returning ModelAndView now not a String, in addition the ModelAndView constructor getting a parameter which is the View name.
and we use model.put to put a value.
another way to do the same thing is

now to read the value in the View

V57 Using JSTL
This video is about the java script tagging language

V58 Setting Up a Jndi DataSource
here he talked how you can define a JNDI datasource in Tomcat then use it, he defined a Database connection,
he followed this link https://tomcat.apache.org/tomcat-7.0-doc/jndi-datasource-examples-howto.html
the steps are:
1- add a Resource to the Tomcat context.xml

2- define a resource-ref in web.xml

3- now you can lookup for this datasource in the code

V59: Bringing In the DAO Code & V60: ContextLoadListner
in the first video he brought Offer & OfferDAO classes,
the idea here that it is better to seperate your beans.xml files, which means it is better to have a beans.xml file just for the database access.
what we do here is
1- creating a package com.spring.dao and add Offer & OfferDAO classes inside
2- create a package com.spring.web.config, inside this package we will put our beans.xml files, we will add dao-context.xml file
4- it is very important to tell spring to check the dao-context.xml, in order to do this you should add ContextLoaderListner in web.xml

V61 Creating a Datasource Bean
in previous video we have created a JNDI datasource to connect to the database, we will add this datasource as bean here
in OfferDAO we have this

this datasource should be the JNDI one, and we will add it to dao-context.xml
V62 Adding Service Layer
to make the real MVC, we will add a service layer, so by that the controller will call the service layer and the service layer will call the database.
we already have com.spring.web.controller where the controllers stay.
we already have com.spring.web.dao where database objects stay
we will create a new package com.spring.web.service and we will put our services objects here.
inside this package we will create the OfferService class

we define the OfferService with @Service which is exactly similar to @Component, but it is just a new name to specify that this is a service,
also we defined service-context.xml which will have the beans definition for services:

now the controller will use the OffersService,

V63 Adding a New Controller
nothing new here, he added a new controller.
V64 Getting URL Parameters

in order to read the URL parameters, you add @RequestParam as parameter to the RequestMapping method, sure you can add as much as you can
V65 - V75 Working with Web Forms
V65: Creating a Form
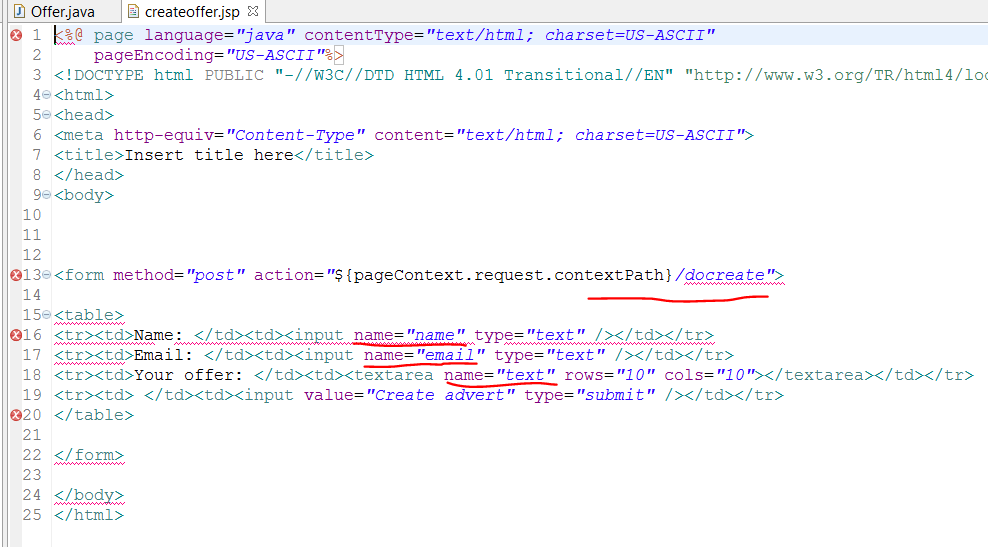
Nothing in this video, we just added a jsp page with a form inside:

V66: Getting Form Value
here we will do a mapping between the form fields and the Offer class, this mapping will give us an offer object directly:
1- The Offer class looks like this:

as you can see the name of the fields are name, email and text.
2- we should give the form fields the same names
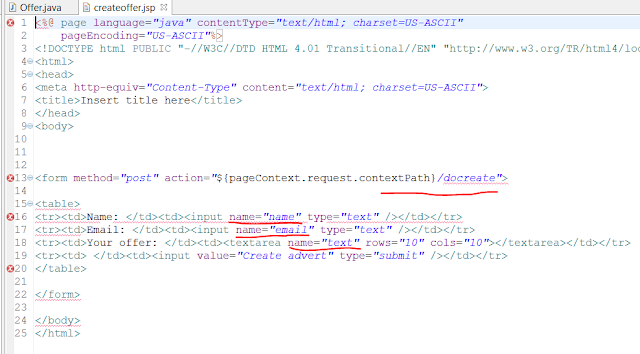
3- now in the action doCreate

as you can see we pass Offer to the docreate, spring will do the mapping for us
V67 & V68 Adding Resources
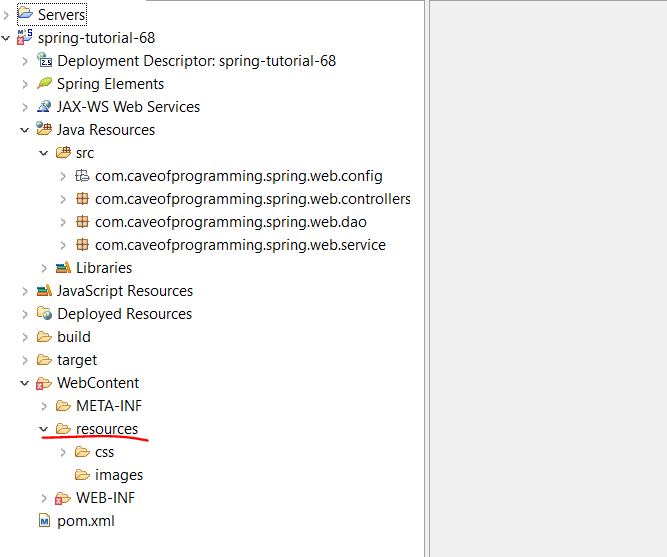
here we will add a resource folder, inside this folder we will put all our css and js files, after adding this folder we will tell spring that the resource folder is here:
1- add resource folder in Webcontent

2- now we have to tell spring that we have resources folder here
 as you can see we added <mvc:resources> we provide the location, the mapping is the url we will using, as you can see we used "/static/**" double start which means looks for all the folders inside resouces, so now you can bring any resources using this url for example:
localhost:8084/spring/static/css/main.css
V69 Adding Hibernate Form Validation Support
here we will talk about an easy way to validate the form data:
1- use BindingResult
 as you can see here we added BindingResult as input to the doCreate method, and we added @Valid to the Offer class, you can use result.hasErrors() to check if there is any errors.
2- you need some jars for @Valid to work, add validation-api.jar to the pom.xml. Also you need to add org.hibernate.jar and hibernate-validator.jar for BindingResult to work

3- now you add the validation you want in Offer class

V70 More Form Validation Tags
in this tutorial we introduce more validation tags to the Offer class

V71: Making Form Remember Values
Currently, if there is any form validation error, the form fields value will be deleted, in this tutorial we will show how we can make spring remember the values:
1- the first thing we should use spring forms tag lib

as you can see we added a taglib, and we used the sf:form and sf:input, sf:textarea.
in addition we use the path attribute, actually the path attribute is the offer property name
and also we add a commandName="offer" this is something that should be passed to createOffer.jsp
we pass this value like this
2- in OfferController
 the createOffer takes us to the createoffer.jsp page, here we should add the commandName which is offer, as you can see we use model.addAttribute for that
and now the form will be able to remember the values
V72: Displaying Form Validations Errors
here we will a new tag to the previous form to show errors:

here as you can see we use sf:errors tag
V73 Creating Custom Validation Errors
you can create your custom validation like @Size or @Pattern
you can watch the video if you want to check the steps, what he did is he opened the source file of one of the validator (e.g @Size) and copied the code.
V74 Hooking UP The Controller and Database Code:
noting new here, he created a create function to create a record in the database, and he called that function
V75 Exception Handling in Spring MVC
lets say that we wanna handle exceptions in our controller, so in case of exceptions we wanna redirect the user to error page
you can for example handle all database exception that might happen in the controller by adding this
 as you can see we added a method with @ExceptionHandler annotation, and the type of exception that should handle, the method return "error" which is the error.jsp page
now this exception handler will work only for this controller, however you can define a global handler for all controllers by adding a class like this

as you can see we annotaed the class @ControllerAdvice,
Nothing in this video, we just added a jsp page with a form inside:

V66: Getting Form Value
here we will do a mapping between the form fields and the Offer class, this mapping will give us an offer object directly:
1- The Offer class looks like this:

as you can see the name of the fields are name, email and text.
2- we should give the form fields the same names
3- now in the action doCreate

V67 & V68 Adding Resources
here we will add a resource folder, inside this folder we will put all our css and js files, after adding this folder we will tell spring that the resource folder is here:
1- add resource folder in Webcontent
2- now we have to tell spring that we have resources folder here

localhost:8084/spring/static/css/main.css
V69 Adding Hibernate Form Validation Support
here we will talk about an easy way to validate the form data:
1- use BindingResult

2- you need some jars for @Valid to work, add validation-api.jar to the pom.xml. Also you need to add org.hibernate.jar and hibernate-validator.jar for BindingResult to work

3- now you add the validation you want in Offer class

V70 More Form Validation Tags
in this tutorial we introduce more validation tags to the Offer class

V71: Making Form Remember Values
Currently, if there is any form validation error, the form fields value will be deleted, in this tutorial we will show how we can make spring remember the values:
1- the first thing we should use spring forms tag lib

in addition we use the path attribute, actually the path attribute is the offer property name
and also we add a commandName="offer" this is something that should be passed to createOffer.jsp
we pass this value like this
2- in OfferController

and now the form will be able to remember the values
V72: Displaying Form Validations Errors
here we will a new tag to the previous form to show errors:

here as you can see we use sf:errors tag
V73 Creating Custom Validation Errors
you can create your custom validation like @Size or @Pattern
you can watch the video if you want to check the steps, what he did is he opened the source file of one of the validator (e.g @Size) and copied the code.
V74 Hooking UP The Controller and Database Code:
noting new here, he created a create function to create a record in the database, and he called that function
V75 Exception Handling in Spring MVC
lets say that we wanna handle exceptions in our controller, so in case of exceptions we wanna redirect the user to error page
you can for example handle all database exception that might happen in the controller by adding this

now this exception handler will work only for this controller, however you can define a global handler for all controllers by adding a class like this

as you can see we annotaed the class @ControllerAdvice,
V76 - V90 Aspect Oriented Programming (AOP)
V76: A Base Project for working with Aspects
nothing here we just created a new project, in order to use aspect oriented you should add the required jar file, spring-aspects.jar
V77: A simple Aspect Example
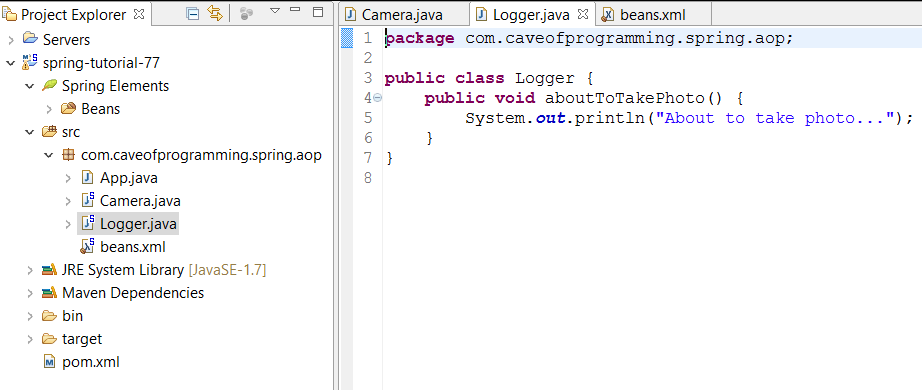
in this tutorial we will use xml file to configure an aspect:
1- we create a camera class

2- we create a log class

3- we will define a before aspect for the snap() method

as you can see we define a pointcut and before aspect
V78: Annotation based aspect
in this tutorial we will define an aspect using annotation
1- the log class will look like this

as you see we define @aspect, usually we define a @Pointcut on a dummy method, and @Before on the method.
2- you should configure your xml and add <aspectj-autoproxy>

V79 Wildcard in Pointcut
you can add wildcard when you define your pointcut

as you can see you can use "*" instead of the method name, the return type, the package name, you can use ".." which means any argument
V80: Advice Types
we have different advice types

the most important one is @Around
V81: Proxies Interfaces and Aspects
there is an important idea here:
lets say that you have a class Camera, and we have an Aspect that intercepts Camera's methods,
what Spring does in the background is creating a Proxy class which is a subclass of Camera, and when you do
context.getBean(); it will return an instance of the Proxy class not the Camera class.
you can check that by writing
Object obj = context.getBean("camera");
System.out.println("Class of camera bean: " + obj.getClass());
System.out.println(obj instanceof Camera);
Note: sure in case we dont have any aspects Spring will return an Object of type Camera, but because we have Aspect that intercepts Camera it will return a Proxy
this is fine, however lets say that Camera implements an interface
public class Camera implements PhotoSnapper {...}
now if you run the same code
Object obj = context.getBean("camera");
System.out.println("Class of camera bean: " + obj.getClass());
System.out.println(obj instanceof Camera); //false
you will notice that Spring will return a Proxy but this time the Proxy is not Subclass of Camera, it is a subclass of the interface.
if you implement multiple interfaces
public class Camera implements PhotoSnapper, XXX {...}
The Proxy will be a sub class of both PhotoSnapper and XXX (something like public class Proxy implements PhotoSnapper, XXX{})
Note: Spring creates this proxy class to add the interception logic.
we have a problem here:
lets say Camera class looks like this
public class Camera implements PhotoSnapper {
public void snap() {
System.out.println("SNAP!");
}
}
public interface PhotoSnapper {
}
as the proxy is instance of PhotoSnapper not Camera, you cannot call the snap() method any more, because the Proxy is not an instance of Camera any more, it is an instance of PhotoSnapper which doesnt have the snap() method.
so in this case to call the snap() method you should not implement any interface, so Spring will create a proxy of type Camera.
or you can change the way Spring handle proxies, you can tell Spring to always return an instance of type Camera not an instance of the interface type by adding the following to your beans.xml
<aop:aspectj-autoproxy proxy-target-class="true"></aop:aspectj-autoproxy>
proxy-target-class="true" tells spring to always return an instance of the base class.
be careful that in this case Spring will create a bean from the target class and from the Proxy(a subclass of the bean) which mean if you have a constructor for example it will be called twice
another way to handle this is to define an interface ICamera for example, put the snap() method in the ICamera and implement it in Camera, by that you dont have any problems because the Proxy that spring retuns will be an instance of ICamera, which means you can call its methods which means you can call the snap() method.
V82: Within Pointcut Designator
we were using execution to define pointcuts
@Pointcut("execution(* com.spring.aop.Camera.snap())")
there is another designator which is within, which means match within package
@Pointcut("within(com.xyz.someapp.trading..*)")
V83: “This”, “Target” and Matching Subpackages
another designators are Target and This
Target is used to target a specific class
@Pointcut("Target(com.spring.aop.Camera)")
This is used to refer to the Proxy that is created from the target class
V84: Annotation-Specific PCDs
you can target classes or methods that have specific annotations
@Pointcut("within(@Deprecated com.spring.*)")
which means targe only classes which are annotated by deprecated
you have alot of other ways to do that you can check them
V85: The Bean PCD
you can target a specific bean
@Pointcut("bean(*camera)")
which means all beans with ID ends with camera
V86: The Args PCD
you can target methods which have specific args
@Pointcut("args(int)")
all methods that takes one int arg
V87: Getting Target Method Arguments

you can use JoinPoint as a parameter in your interceptor to get information about the intercepted method
V88: Getting Arguments Using “Args”
i really didnt like this video, i dont think i am gonna use what is mentioned here
V89: Combining Pointcuts
you can combine pointcuts using && or || or !
@Before("targetCamera() && somePointcut(exposure, aperture)")
V90: Introductions: Adding Functionality Using Aspects
in this tutorial he talked about the follwoing idea:
Imagine that you have multiple classes that should implement an interface, you can write an aspect and tell the aspect that these classes should implement this interface:

as you can see we defined private IMachine machine, which is the interface that we want the classes to implement, use @DeclareParents, in value attribute we set the classes that should implement IMachine, defaultImpl is the class that implement the IMachine interface
So rather than go to all the classes and make them implement IMachine interface, you can use Aspectj
TYPES OF WEAVING
we have 3 types of weaving,
compile time: happens when we compile
loadtime: happens when the class is loaded
runtime:
nothing here we just created a new project, in order to use aspect oriented you should add the required jar file, spring-aspects.jar
V77: A simple Aspect Example
in this tutorial we will use xml file to configure an aspect:
1- we create a camera class

2- we create a log class
3- we will define a before aspect for the snap() method
as you can see we define a pointcut and before aspect
V78: Annotation based aspect
in this tutorial we will define an aspect using annotation
1- the log class will look like this

as you see we define @aspect, usually we define a @Pointcut on a dummy method, and @Before on the method.
2- you should configure your xml and add <aspectj-autoproxy>

V79 Wildcard in Pointcut
you can add wildcard when you define your pointcut

as you can see you can use "*" instead of the method name, the return type, the package name, you can use ".." which means any argument
V80: Advice Types
we have different advice types

the most important one is @Around
V81: Proxies Interfaces and Aspects
there is an important idea here:
lets say that you have a class Camera, and we have an Aspect that intercepts Camera's methods,
what Spring does in the background is creating a Proxy class which is a subclass of Camera, and when you do
context.getBean(); it will return an instance of the Proxy class not the Camera class.
you can check that by writing
Object obj = context.getBean("camera");
System.out.println("Class of camera bean: " + obj.getClass());
System.out.println(obj instanceof Camera);
Note: sure in case we dont have any aspects Spring will return an Object of type Camera, but because we have Aspect that intercepts Camera it will return a Proxy
this is fine, however lets say that Camera implements an interface
public class Camera implements PhotoSnapper {...}
now if you run the same code
Object obj = context.getBean("camera");
System.out.println("Class of camera bean: " + obj.getClass());
System.out.println(obj instanceof Camera); //false
you will notice that Spring will return a Proxy but this time the Proxy is not Subclass of Camera, it is a subclass of the interface.
if you implement multiple interfaces
public class Camera implements PhotoSnapper, XXX {...}
The Proxy will be a sub class of both PhotoSnapper and XXX (something like public class Proxy implements PhotoSnapper, XXX{})
Note: Spring creates this proxy class to add the interception logic.
we have a problem here:
lets say Camera class looks like this
public class Camera implements PhotoSnapper {
public void snap() {
System.out.println("SNAP!");
}
}
public interface PhotoSnapper {
}
as the proxy is instance of PhotoSnapper not Camera, you cannot call the snap() method any more, because the Proxy is not an instance of Camera any more, it is an instance of PhotoSnapper which doesnt have the snap() method.
so in this case to call the snap() method you should not implement any interface, so Spring will create a proxy of type Camera.
or you can change the way Spring handle proxies, you can tell Spring to always return an instance of type Camera not an instance of the interface type by adding the following to your beans.xml
<aop:aspectj-autoproxy proxy-target-class="true"></aop:aspectj-autoproxy>
proxy-target-class="true" tells spring to always return an instance of the base class.
be careful that in this case Spring will create a bean from the target class and from the Proxy(a subclass of the bean) which mean if you have a constructor for example it will be called twice
another way to handle this is to define an interface ICamera for example, put the snap() method in the ICamera and implement it in Camera, by that you dont have any problems because the Proxy that spring retuns will be an instance of ICamera, which means you can call its methods which means you can call the snap() method.
V82: Within Pointcut Designator
we were using execution to define pointcuts
@Pointcut("execution(* com.spring.aop.Camera.snap())")
there is another designator which is within, which means match within package
@Pointcut("within(com.xyz.someapp.trading..*)")
V83: “This”, “Target” and Matching Subpackages
another designators are Target and This
Target is used to target a specific class
@Pointcut("Target(com.spring.aop.Camera)")
This is used to refer to the Proxy that is created from the target class
V84: Annotation-Specific PCDs
you can target classes or methods that have specific annotations
@Pointcut("within(@Deprecated com.spring.*)")
which means targe only classes which are annotated by deprecated
you have alot of other ways to do that you can check them
V85: The Bean PCD
you can target a specific bean
@Pointcut("bean(*camera)")
which means all beans with ID ends with camera
V86: The Args PCD
you can target methods which have specific args
@Pointcut("args(int)")
all methods that takes one int arg
V87: Getting Target Method Arguments

you can use JoinPoint as a parameter in your interceptor to get information about the intercepted method
V88: Getting Arguments Using “Args”
i really didnt like this video, i dont think i am gonna use what is mentioned here
V89: Combining Pointcuts
you can combine pointcuts using && or || or !
@Before("targetCamera() && somePointcut(exposure, aperture)")
V90: Introductions: Adding Functionality Using Aspects
in this tutorial he talked about the follwoing idea:
Imagine that you have multiple classes that should implement an interface, you can write an aspect and tell the aspect that these classes should implement this interface:

as you can see we defined private IMachine machine, which is the interface that we want the classes to implement, use @DeclareParents, in value attribute we set the classes that should implement IMachine, defaultImpl is the class that implement the IMachine interface
So rather than go to all the classes and make them implement IMachine interface, you can use Aspectj
TYPES OF WEAVING
we have 3 types of weaving,
compile time: happens when we compile
loadtime: happens when the class is loaded
runtime:
V91 - V113 Spring Security and Managing Users
V91: Servlets Filters: A Review
just to remember normal servlet filter, firstly you add a filter class
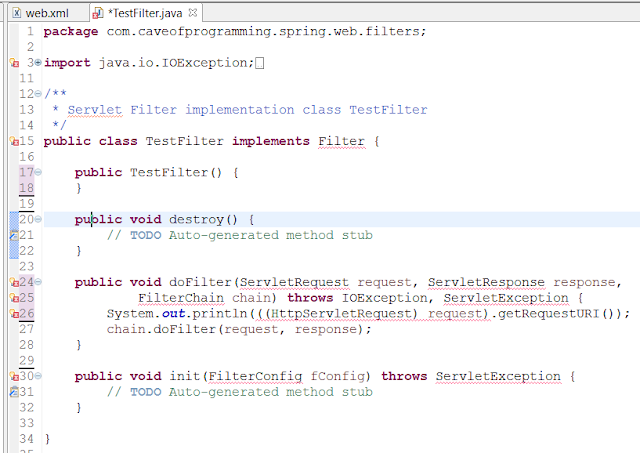
and sure you should add the filter definition to the web.xml

V92: Adding Spring Security Filter
in this tutorial we will add a spring security filter in order to check if users has access or not
1- firstly you should add the following libraries to pom.xml spring-security-core, spring-security-web, spring-security-config.
2- you should add DeligatingFilterProxy to web.xml

3- we will add a new security-context.xml to handle the security beans, insure that security scheme is there

4- also be sure that you add the security-context.xml to web.xml

V93: Adding a Spring Login Form
we will continue here in adding a spring form
in spring you can authenticate users based on LDAP, or a database that contains users or ...
in this tutorial we will authenticate users based on a predefined list that will be defined in security-context.xml
1- add <security:authentication-manager> to the secuirty-context.xml
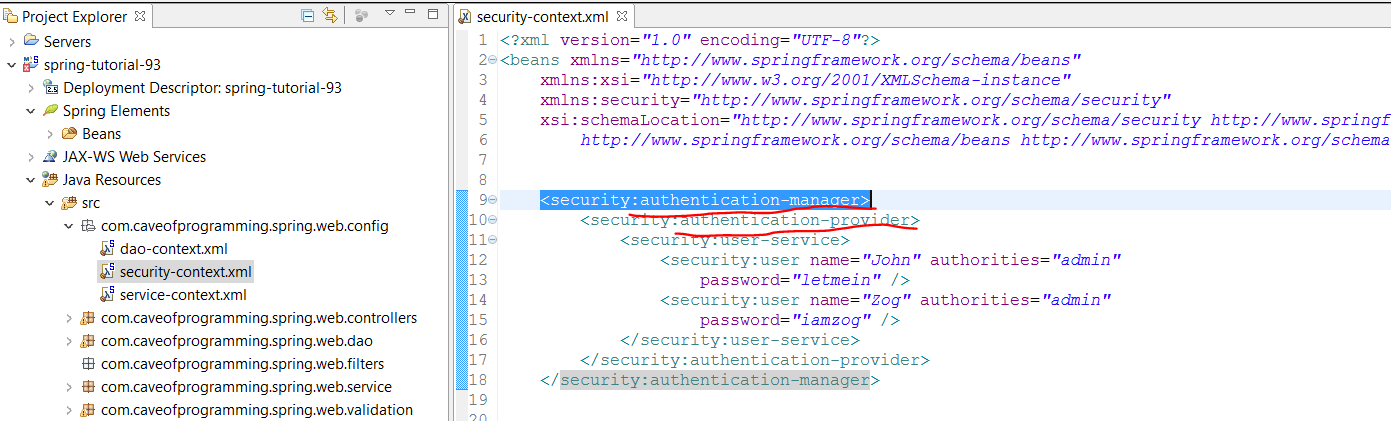
as you can see we defined an authentication-provider inside, and we defined a list of users.
2- now you should define which urls should ask for login information,
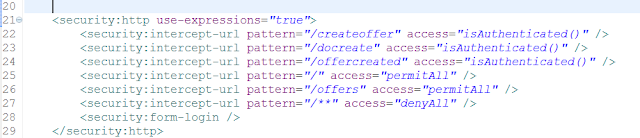
as you can see we have the pattern "/**" with denyAll, which means all urls need authentication, then we start to add exceptions like "/offers" with permitAll users, and "/offerecreated" with isAuthenticated() which means they can enter if they were authenticated before
Note: "/**" will prevent access to all urls, even to css
Note: in case the user is not authenticated Spring will redirect us to a login page to enter username and password.
V94: Serving Static Resources: Access Rules
in this tutorial we will give access to our css files.
if you remember we defined the following in previous tutorials:

mvc:resources has access to the resources folder which currently has this url /static/**
we will give access to this url by adding a "permitAll" access in secuirty-context.xml

V95: Customising the Login Form
in this tutorial we will set a custom login page, not the default page that spring provide:
1- create a login page, login.jsp
2- define a login controller:

as you can see the LoginController will return the user to login.jsp.
3- now you should tell spring to use the login page, you do that in the security-context.xml

V96: Displaying Error Page
in this tutorial we will add an error in case the username or password is wrong.
1- in security-context.xml we should add this

we set the authentication-failure-url to go to the same page but with error querystring
2- now in the login.jsp we will add some logic to handle the error
 V97: Authorising Users from a Database
here we will authenticate users using a table in the database.
1- as you remeber we have defined a datasource before in dao-context.xml
 2- now we should define an authetication provider

3- you should have these tables in the database
users(username,password) and authorities(username, authority).
4- in case you dont have the default tables structure, you should add authorities-by-username-query and users-by-username-queries to <security:jdbc-user-service>
V98: Making the “Create Account” Form Work
there is nothing related to Spring in this tutorial, he created a new jsp page with Create Account form, and a new controller, also he added User DAO.


V99: Making the “Create Account” Form Work
there is no new spring stuff here.
V100: Adding Validation to the User Form
nothing new here
V101: Dealing With Duplicate Username
also nothing here
V102: Storing Validation Messages in a Property File
in this tutorial we will see how to write the error messages in Property file.
1- we will create a new package and a property file inside.
the package is com.spring.web.messages
and the property file is messages.properties
2- we should add the following bean

as you can see, the bean is from class ResourceBundleMessageSource
and we set the basename as the path to the property file
3- inside the property file, the properties should be of this style
Error.class.property
for example, to set the message for string size error in User class for the property userName. the entry will be
Size.user.username = asdf asdfasdfa

4- we dont add anything in the user class
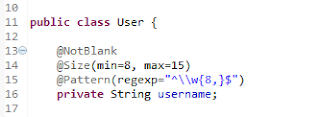
V103: Using JQuery to verify the password
Nothing new here
V104: Using Property File Values in JSPs
in this tutorial we will see how to read the properties that we defined before in JSP file
lets say you have this property in the property file
MatchedPasswords.user.password = Passwords match.

V105: Adding a Logout Link
simply we create a logout.jsp, we added a controller for that, and then we add this to security-context.xml
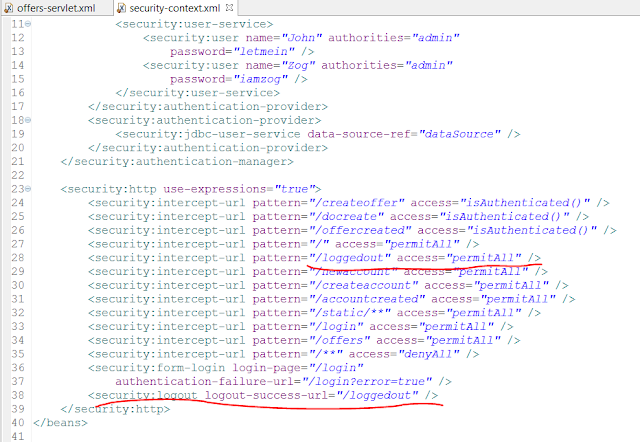
Video 106: Working With Roles
here we will allow user to see a page if they have a certain role.
from a previous tutorial, we created Authorities table to add user authorities, you can add whatever authorities you like there, and then add the following to the security-context.xml
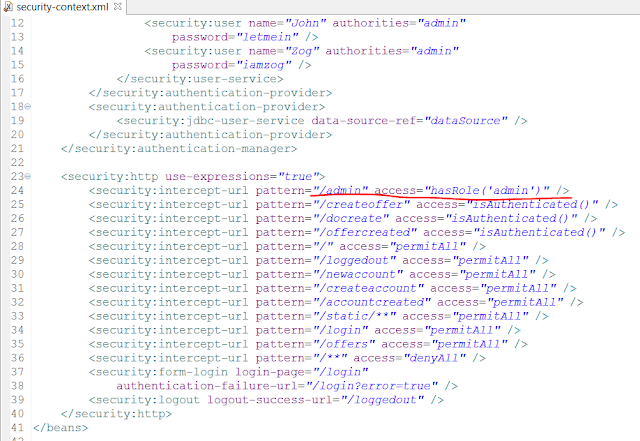
as you can see we use hasRole('admin')
Video 107: Outputting Text Based on Authentication Status
here we will do something like, dont show this link if the user is not logged in,
we will do that in jsp pages.
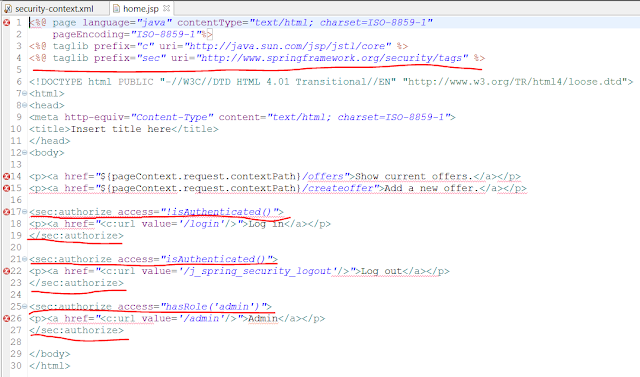
as you can see we are user the sec tag library and <sec:authorize>
Video 108: Row Mapping with BeanPropertyRowMapper


we said before that you can write your own database queries to authenticate users (you can do that if you have different table structure for example).
the previous picture shows how you can do this.
Video 110: Method-Level Access Controlb
before we were preventing users to enter a specific URL based on a ROLE, now we are gonna provide Method-level access.
1- in security-context.xml we will enable annotation for this matter.

2- you do this for methods:

as you can see we use @Secured for this matter.
Video 111: Catching Secure Annotation Violation
in the picture above, if a user try to call create method and he doesn't have ADMIN or USER roles, spring will throw AccessDeniedException , you can catch and handle this exception.
you can define a global execption to handle the exception and redirect the user to wherever you want

other way to handle is to create a jsp page and redirect users to that page if they don't have access
1- create denied.jsp
2- add a controller to go to denied.jsp


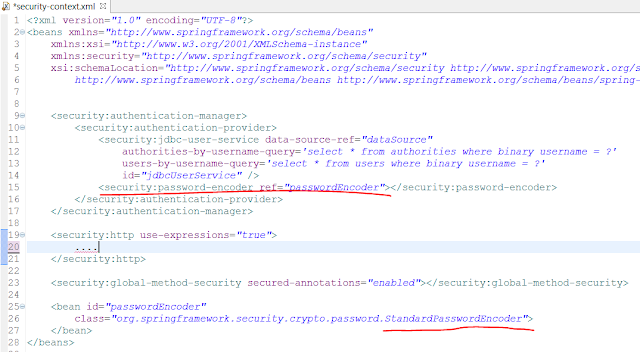

just to remember normal servlet filter, firstly you add a filter class

and sure you should add the filter definition to the web.xml

V92: Adding Spring Security Filter
in this tutorial we will add a spring security filter in order to check if users has access or not
1- firstly you should add the following libraries to pom.xml spring-security-core, spring-security-web, spring-security-config.
2- you should add DeligatingFilterProxy to web.xml

3- we will add a new security-context.xml to handle the security beans, insure that security scheme is there

4- also be sure that you add the security-context.xml to web.xml

V93: Adding a Spring Login Form
we will continue here in adding a spring form
in spring you can authenticate users based on LDAP, or a database that contains users or ...
in this tutorial we will authenticate users based on a predefined list that will be defined in security-context.xml
1- add <security:authentication-manager> to the secuirty-context.xml
as you can see we defined an authentication-provider inside, and we defined a list of users.
2- now you should define which urls should ask for login information,

as you can see we have the pattern "/**" with denyAll, which means all urls need authentication, then we start to add exceptions like "/offers" with permitAll users, and "/offerecreated" with isAuthenticated() which means they can enter if they were authenticated before
Note: "/**" will prevent access to all urls, even to css
Note: in case the user is not authenticated Spring will redirect us to a login page to enter username and password.
V94: Serving Static Resources: Access Rules
in this tutorial we will give access to our css files.
if you remember we defined the following in previous tutorials:

mvc:resources has access to the resources folder which currently has this url /static/**
we will give access to this url by adding a "permitAll" access in secuirty-context.xml

V95: Customising the Login Form
in this tutorial we will set a custom login page, not the default page that spring provide:
1- create a login page, login.jsp
2- define a login controller:
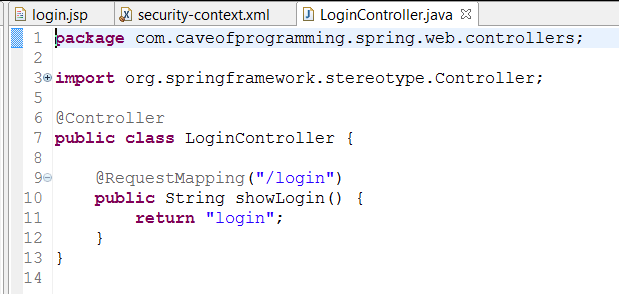
as you can see the LoginController will return the user to login.jsp.
3- now you should tell spring to use the login page, you do that in the security-context.xml
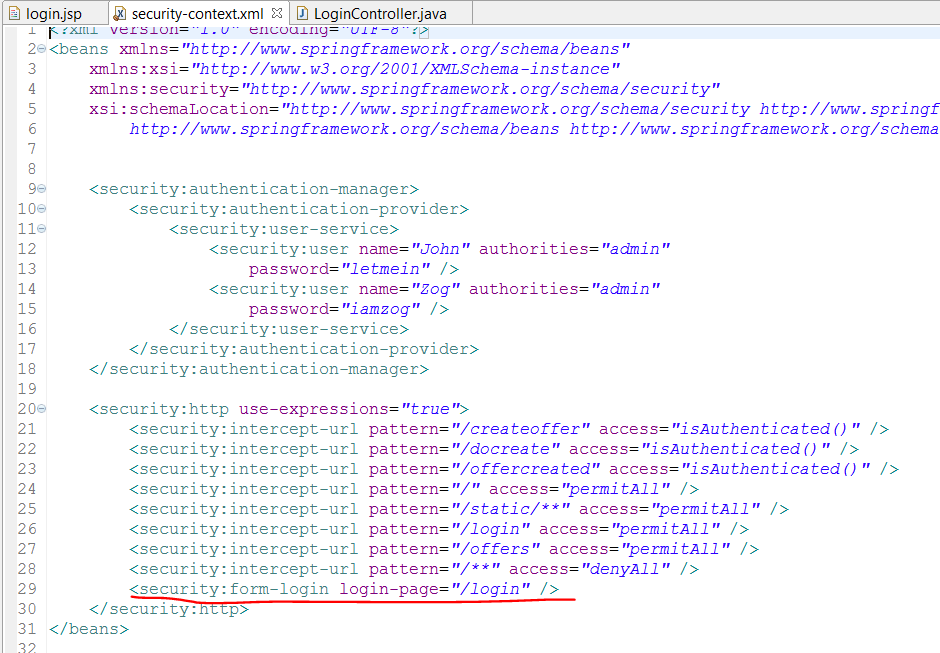
V96: Displaying Error Page
in this tutorial we will add an error in case the username or password is wrong.
1- in security-context.xml we should add this

we set the authentication-failure-url to go to the same page but with error querystring
2- now in the login.jsp we will add some logic to handle the error

here we will authenticate users using a table in the database.
1- as you remeber we have defined a datasource before in dao-context.xml


3- you should have these tables in the database
users(username,password) and authorities(username, authority).
4- in case you dont have the default tables structure, you should add authorities-by-username-query and users-by-username-queries to <security:jdbc-user-service>
V98: Making the “Create Account” Form Work
there is nothing related to Spring in this tutorial, he created a new jsp page with Create Account form, and a new controller, also he added User DAO.


V99: Making the “Create Account” Form Work
there is no new spring stuff here.
V100: Adding Validation to the User Form
nothing new here
V101: Dealing With Duplicate Username
also nothing here
V102: Storing Validation Messages in a Property File
in this tutorial we will see how to write the error messages in Property file.
1- we will create a new package and a property file inside.
the package is com.spring.web.messages
and the property file is messages.properties
2- we should add the following bean

as you can see, the bean is from class ResourceBundleMessageSource
and we set the basename as the path to the property file
3- inside the property file, the properties should be of this style
Error.class.property
for example, to set the message for string size error in User class for the property userName. the entry will be
Size.user.username = asdf asdfasdfa

4- we dont add anything in the user class
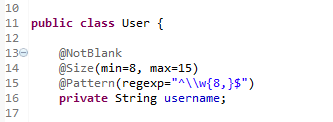
Spring will do the mapping for us
V103: Using JQuery to verify the password
Nothing new here
V104: Using Property File Values in JSPs
in this tutorial we will see how to read the properties that we defined before in JSP file
lets say you have this property in the property file
MatchedPasswords.user.password = Passwords match.
to read this property in JSP file

as you can see we added fmt taglib, and we use <fmt:message>
simply we create a logout.jsp, we added a controller for that, and then we add this to security-context.xml

Video 106: Working With Roles
here we will allow user to see a page if they have a certain role.
from a previous tutorial, we created Authorities table to add user authorities, you can add whatever authorities you like there, and then add the following to the security-context.xml

as you can see we use hasRole('admin')
Video 107: Outputting Text Based on Authentication Status
here we will do something like, dont show this link if the user is not logged in,
we will do that in jsp pages.

as you can see we are user the sec tag library and <sec:authorize>
Video 108: Row Mapping with BeanPropertyRowMapper
as you can see in jdbc.query we are using BeanPropertyRowMapper, this will map the returned value to User.class and returns List<User>
Video 109: Using Custom Authentication Queries: Case Sensitive Usernames

the previous picture shows how you can do this.
Video 110: Method-Level Access Controlb
before we were preventing users to enter a specific URL based on a ROLE, now we are gonna provide Method-level access.
1- in security-context.xml we will enable annotation for this matter.

2- you do this for methods:

as you can see we use @Secured for this matter.
Video 111: Catching Secure Annotation Violation
in the picture above, if a user try to call create method and he doesn't have ADMIN or USER roles, spring will throw AccessDeniedException , you can catch and handle this exception.
you can define a global execption to handle the exception and redirect the user to wherever you want

other way to handle is to create a jsp page and redirect users to that page if they don't have access
1- create denied.jsp
2- add a controller to go to denied.jsp

3- add the following to security-context.xml

as you can see we added security:access-denied-handler to point to that page.
Video 112: Adding "Remember Me" Functionality
to configure the default session timeout, you should set the value in web.xml
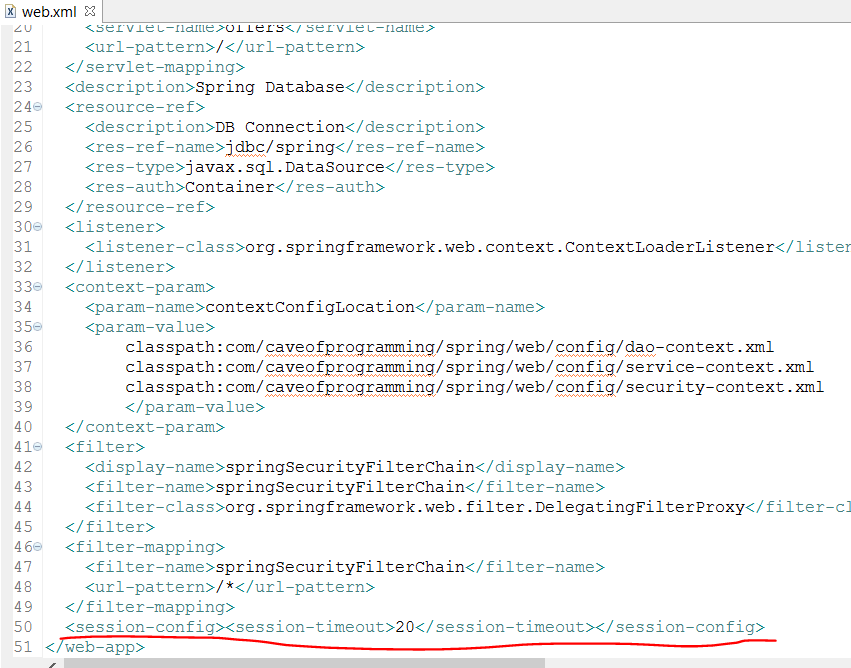
we use <session-timeout> to set this value.
to add remember me functionality,
1- in security-context.xml we add

as you can see we add <security:remember-me> the key is just a key you can give any name, the user-service-ref is the id of the authentication-provider that you want to use
4- now you add remember me checkbox in the html page:
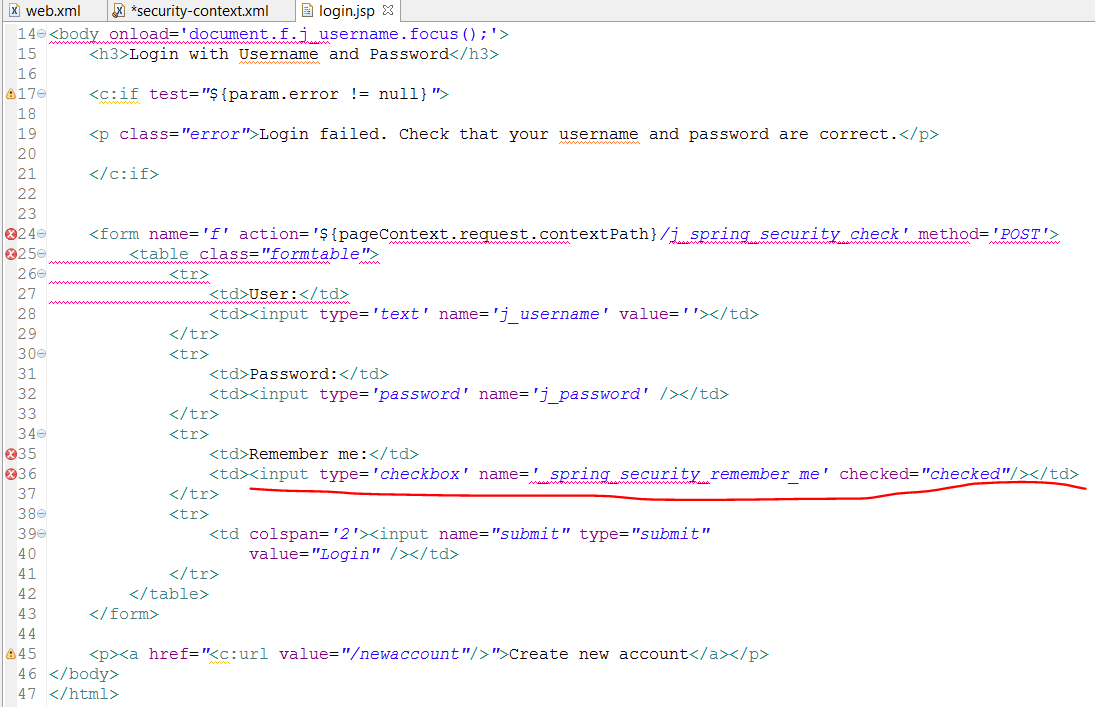
as you can see the name must be "_spring_security_remember_me"
Video 113: Encrypting Password
in this tutorial we will save encrypted password in the database and compare encrypted password.
1- add StandardPasswordEncoder bean to security-context.xml

2- you should tell the Authentication-Manager that we are using encrypted password:

3- encrypt the password before you do any database operation:

V114 - 118 Apache Tiles and Spring MVC
Apache Tiles is a way to build your web page out of different components (e.g. footer, header, side page, main page)
Another library that you can use is Sitemesh
Video 114: The Dependencies
in this video we just added the required dependencies
Video 115: HelloWord
1- before, we were using jspViewResolver now we will use tilesViewResolver.

as you can see we use TilesViewResolver bean for resolving the view.
the TilesConfigurer bean is basically a bean which takes a list of xml files where we define the layout of our pages, we defined one layout for now which is default.xml
2- define the layout.

defining the layout is basically a Tile thing.
3- sure, create default.jsp
Video 116: Adding Header & Footer
in this tutorial we will see how to add header and footer
1- in the layout xml file (default.xml) in our case
 as you can see you define the header, footer as attributes,
2- create the pages mentioned above, header.jsp, content.jsp, footer.jsp
3- use the attributes:
 as you can see, firstly add the taglib, then use tiels:insertAttribute
Video 117: Formatting the Offers Application
here we are just adding css files to make pages little nicer
Video 118: Creating Tiles from JSP files
we convert all the jsp files to tiles style
one thing here about Tiles:

as you can see we are defining new definition with extends, so you don't have to redefine your attributes for each page.
Another library that you can use is Sitemesh
Video 114: The Dependencies
in this video we just added the required dependencies
Video 115: HelloWord
1- before, we were using jspViewResolver now we will use tilesViewResolver.

as you can see we use TilesViewResolver bean for resolving the view.
the TilesConfigurer bean is basically a bean which takes a list of xml files where we define the layout of our pages, we defined one layout for now which is default.xml
2- define the layout.

defining the layout is basically a Tile thing.
3- sure, create default.jsp
Video 116: Adding Header & Footer
in this tutorial we will see how to add header and footer
1- in the layout xml file (default.xml) in our case

2- create the pages mentioned above, header.jsp, content.jsp, footer.jsp
3- use the attributes:

Video 117: Formatting the Offers Application
here we are just adding css files to make pages little nicer
Video 118: Creating Tiles from JSP files
we convert all the jsp files to tiles style
one thing here about Tiles:

as you can see we are defining new definition with extends, so you don't have to redefine your attributes for each page.
V119 - V125 Logging and Testing
Video 119: Adding Log4j Logging & V120 Resolving Logging Conflict
1- Add log4j jar file to pom.xml
2- Add log4j.properties somewhere in your classpath

3- add -Dlog4j.debug to jvm parameters in order to see how everything is loaded
4- sometimes you may have a problem with logging because other libraries may also use other logging jars, Spring uses Jakarta Common Logging Api, which basically looks for logging implementation, so in case you have a library that uses Log4j for debugging and another one uses slf4j for example, spring will be confused and may use one not the other.
Video 121: using logging

Video 122: Creating a MySQL Test Database
here we create a MySQL database just for testing
Video 123: Using Spring Profiles
here we add spring-test dependency to pom.xml
and we defined some profiles, so we will have production profile and development profiles.
so we can set some beans to be initiated in productions and others for developments
to do that
1- in web.xml

we add spring.profiles.active
2- now you can write this

Video 124: Creating JUNIT Tests
Here we added new profile which is Dev, so we can use it for testing,
then you can add this:

i dont like the way he implemented this, i prefer to create new project for testing and add dependency to the project we want to test.
Video 125: Coding Junit DAO Tests
nothing new here
V126 - V135 Improving the application + @Cachable for caching
@Cachable
you can cache a class or a function, in that case if you call the function another time with the same parameters you will get the value directly without computation
/////////////////////////////
Most of the things mentioned here are not Spring related, we will add just the stuff related to spring
Video 129: Getting the username o the logged-in user.
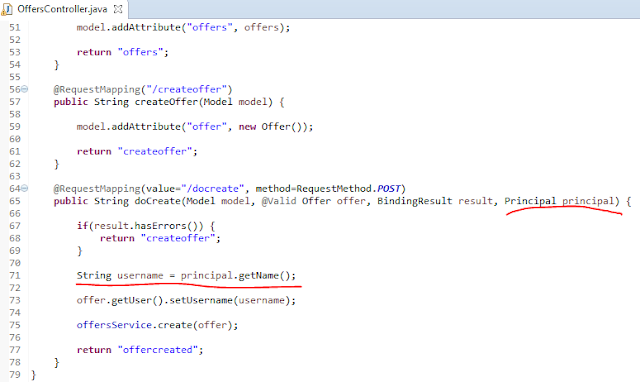
as you can see in your controller you can Principal to get information about users.
Video 136: Introduction Hibernate
nothing here
Video 137: A simple Hibernate Query
1- add the dependencies to pom.xml, we add spring-orm and hibernate-core

2- in datasource.xml add a bean of AnnotationSessionFactoryBean

as you can see you set the datasource, the hibernateProperties you add hibernate.dialect which is the database that you are using.
PackagesToScan, here we set the packages that have the Entities
3- now in UsersDao we were using select statements, now we will use Hibernate,

as you can see, we added SessionFactory, we defined a session(), and we use createQuery() method.
4- now create your entities:

as you see, we use @Entity, @Table and so on...
Video 138: Saving Objects
to save an object to database

Video 139 Validation Groups and Password Encryption
currently, we have the following:

as you can see the password check the size to be less than 15,
however, as we want to encrypt the password before saving we will write this

Hibernate will throw an exception here, because when we encrypt the password the size will be more than 15,
In order to fix this issue, we should tell spring to use the validation only when we submit the form not when we save to database
In order to do that we should use something called Validation Groups,
1- define 2 interfaces PersistanceValidationGroup and FormValidationGroup, sure the name is not important.

2- no simply you do this

as you can see, for each validation you assign the group that you want,
in case of passoword size we assigned it to the FormValidationGroup.
3- now we should tell the form to use the FormValidationGroup:

as you can see we use @Validated(FormValidationGroup.class).
4- we should tell hibernate to use PersistanceValidationGroup

as you can see, we add this to the bean definition as property.
Video 140: Translating Hibernate Exceptions to Spring Exceptions
if you remember we defined this ErrorHandler before

as you can see the handler catch all DataAccessException.
However, Hibernate doesnt throw this exception, so inorder to catch Hibernate database exceptions we should do exception translation:
1- add this bean PersistenceExceptionTranslationPostProcessor

2- add @Repository to classes that do hibernate operations:

Video 141: Queries With Criteria
in order to run queires with Criteria in hibernate

Video 142: Mapping Many-to-one Relationships
in order to define Many-to-one relationship, for example offers and users relationship

Join column is the freign key
Video 143: Restriction on Joind Tables
for example, if you want to get offers related to a specific user

Video 144: Multiple Criteria
in order to make a query with multiple criteria
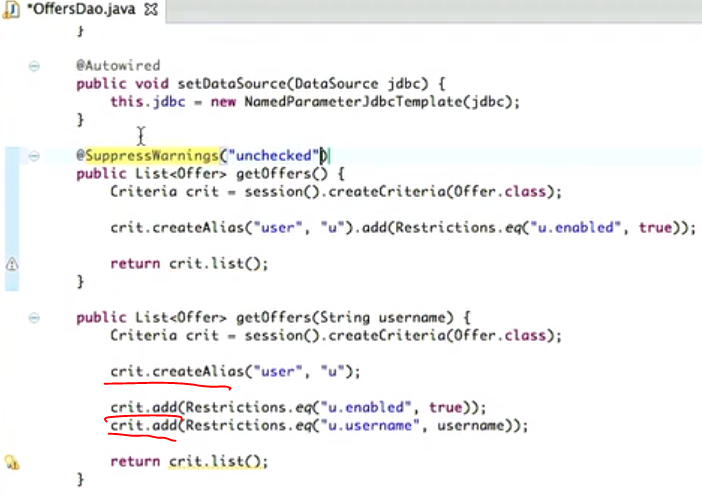
Video 145: Updating Objects

as you can see we are using session().update or session().save.
also there is another method which is session().saveOrUpdate().
Video 146: Deleting Object

as you can see we createQuery() in order to delete
Video 147: Completing the Offers DAO
Nothing important here
you can cache a class or a function, in that case if you call the function another time with the same parameters you will get the value directly without computation
/////////////////////////////
Most of the things mentioned here are not Spring related, we will add just the stuff related to spring
Video 129: Getting the username o the logged-in user.

as you can see in your controller you can Principal to get information about users.
Video 136 - V147 Hibernate
Video 136: Introduction Hibernate
nothing here
Video 137: A simple Hibernate Query
1- add the dependencies to pom.xml, we add spring-orm and hibernate-core

2- in datasource.xml add a bean of AnnotationSessionFactoryBean

as you can see you set the datasource, the hibernateProperties you add hibernate.dialect which is the database that you are using.
PackagesToScan, here we set the packages that have the Entities
3- now in UsersDao we were using select statements, now we will use Hibernate,

as you can see, we added SessionFactory, we defined a session(), and we use createQuery() method.
4- now create your entities:

as you see, we use @Entity, @Table and so on...
Video 138: Saving Objects
to save an object to database

Video 139 Validation Groups and Password Encryption
currently, we have the following:

as you can see the password check the size to be less than 15,
however, as we want to encrypt the password before saving we will write this

Hibernate will throw an exception here, because when we encrypt the password the size will be more than 15,
In order to fix this issue, we should tell spring to use the validation only when we submit the form not when we save to database
In order to do that we should use something called Validation Groups,
1- define 2 interfaces PersistanceValidationGroup and FormValidationGroup, sure the name is not important.
2- no simply you do this

as you can see, for each validation you assign the group that you want,
in case of passoword size we assigned it to the FormValidationGroup.
3- now we should tell the form to use the FormValidationGroup:

as you can see we use @Validated(FormValidationGroup.class).
4- we should tell hibernate to use PersistanceValidationGroup
as you can see, we add this to the bean definition as property.
Video 140: Translating Hibernate Exceptions to Spring Exceptions
if you remember we defined this ErrorHandler before

as you can see the handler catch all DataAccessException.
However, Hibernate doesnt throw this exception, so inorder to catch Hibernate database exceptions we should do exception translation:
1- add this bean PersistenceExceptionTranslationPostProcessor

2- add @Repository to classes that do hibernate operations:

Video 141: Queries With Criteria
in order to run queires with Criteria in hibernate
Video 142: Mapping Many-to-one Relationships
in order to define Many-to-one relationship, for example offers and users relationship
Join column is the freign key
Video 143: Restriction on Joind Tables
for example, if you want to get offers related to a specific user
Video 144: Multiple Criteria
in order to make a query with multiple criteria
Video 145: Updating Objects

as you can see we are using session().update or session().save.
also there is another method which is session().saveOrUpdate().
Video 146: Deleting Object
as you can see we createQuery() in order to delete
Video 147: Completing the Offers DAO
Nothing important here
V148 - V159 Spring Webflow
Video 148: Introducing Webflow
you use it to define a sequence of steps.
Video 149: Creating a Flow Registery
1- add spring-webflow dependency
2- add webflow-config namespace in your beans.xml

3- add webflow-config:flow-registry

here you set the base-path, which is the folder that will have the workflow definintion which is an xml file.
flow-location is the workflow file name,
4- add contact-flow.xml
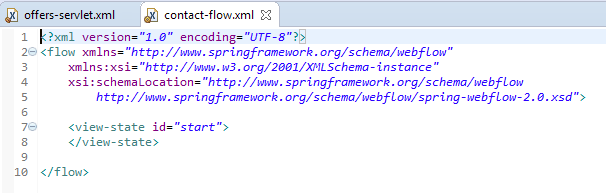
when we define a flow, we basically define states in view-state, we will do that in the next tutorial
Video 150: Hooking Up URLs to Webflows
Here we will add all the required beans

These are things that you should remember,
1- FlowRegistry
2- FlowExecutor
3-FlowHandlerAdapter
4-FlowHandlerMapping
as you can see the id "message" will be used in the url, so to start the workflow you go to ..../message
Video 151: Connecting Webflow and Apache Tiles
as you remember the contact-flow.xml looks like this

the view-state means jsp pages, so showContactForm should be a jsp page.
so, from the previous tutorial if you go to the url ..../message, it will go to the first page showContactForm.jsp
we should create this page, however to be able to use Apache Tiles with these pages you should add couple of extra beans

tilesViewResolver has been defined in previous videos.
now you can use Apache Tiles in your webflow pages.
In apache tiles definition we should add

as you can see showContactForm will redirect me to contact.jsp
Video 152: Creating a "Messages" Table
Nothing here, we added a Message table in the database, we will use it later
Video 153: Creating a Message Class
Here we added a Message Entity Class, and MessagesDao for database operations, we will use these classes later


Video 154: Adding a Message Form
as you remember before, we said that the workflow view state showContactForm will redirect us to contact.jsp
here we will define the contact.jsp page, which is going to contain a form
as you remember, we start the form by going to url ..../message, so we want the form to submit back to the same page, that is why we have commandName = message
you need also to add the hidden field _flowExecuationKey
Video 155: Transition
so now lets say we want to move from one page to another
1- you add this in your workflow

as you can see we define a transition on event send to go to the next state,
now we should add this
we added a hidden field to set the _eventId to send
now when we press the button we move to another state (another jsp page).
Video 156: Action States
in the previous tutorials we were defining view states in our workflow, view state will move us from one page to another,
here we will add Action State, in action state you can run code before moving to another page

as you can see, in the expression you write the name of the function that you want to execute, in this case it is the sendMessage() in the userService class.
Video 157: Linking to Webflows
Nothing much here, we did one thing.
as you can see we have a message object, and we set the value of username for this object
Video 158: Validating Webflow Forms
in order to validate the form in webflow we should add this

Video 159: Accessing User Details in Webflow
lets say you want to access user information, you can use the currentUser variable which comes with webflow
the usersService.getUser() is a function we defined, and we pass currentUser?.name, the question mark is used to check if currentUser is null or not (we talked about this before).
V160 - V169 JSON and AJAX
Video 160: Creating a JSON Server
in this tutorial we talk about JACKSON, jackson is a library that converts java object to JSON and vice versa.
firstly we should add Jackson mapper dependencies which are jackson-mapper-asl and jackson-core-asl
then what you can do is this

the @ResponseBody will know that we are generating appplication/json and will convert the object to json
Sure JACKSON can be used in code, you can check this tutorial http://www.mkyong.com/java/how-to-convert-java-object-to-from-json-jackson/
Video 161: Updating Dynamically with JQuery
we talked about $.getJSON function, nothing related to SPRING
Video 162 Generating Pages with Javascript
nothing related to spring
Video 163 Adding Reply Boxes
also javascript stuff
Video 164 Showing and Hiding the Reply Forms
also javascript
Video 165 Stopping and Starting the Timer
also javascript
video 166 Getting the text from the right textarea
javascript stuff
Video 167 Posting Back JSON Data
Nothing new
Video 168 Giving the User Feedback
javascript stuff
Video 169: Sending Email With Springmail
1- we should add spring-context-support dependency and javax.mail
2- then we add this bean
 3- then you wire the bean and use it

to use it

in this tutorial we talk about JACKSON, jackson is a library that converts java object to JSON and vice versa.
firstly we should add Jackson mapper dependencies which are jackson-mapper-asl and jackson-core-asl
then what you can do is this
the @ResponseBody will know that we are generating appplication/json and will convert the object to json
Sure JACKSON can be used in code, you can check this tutorial http://www.mkyong.com/java/how-to-convert-java-object-to-from-json-jackson/
Video 161: Updating Dynamically with JQuery
we talked about $.getJSON function, nothing related to SPRING
Video 162 Generating Pages with Javascript
nothing related to spring
Video 163 Adding Reply Boxes
also javascript stuff
Video 164 Showing and Hiding the Reply Forms
also javascript
Video 165 Stopping and Starting the Timer
also javascript
video 166 Getting the text from the right textarea
javascript stuff
Video 167 Posting Back JSON Data
Nothing new
Video 168 Giving the User Feedback
javascript stuff
Video 169: Sending Email With Springmail
1- we should add spring-context-support dependency and javax.mail
2- then we add this bean


to use it
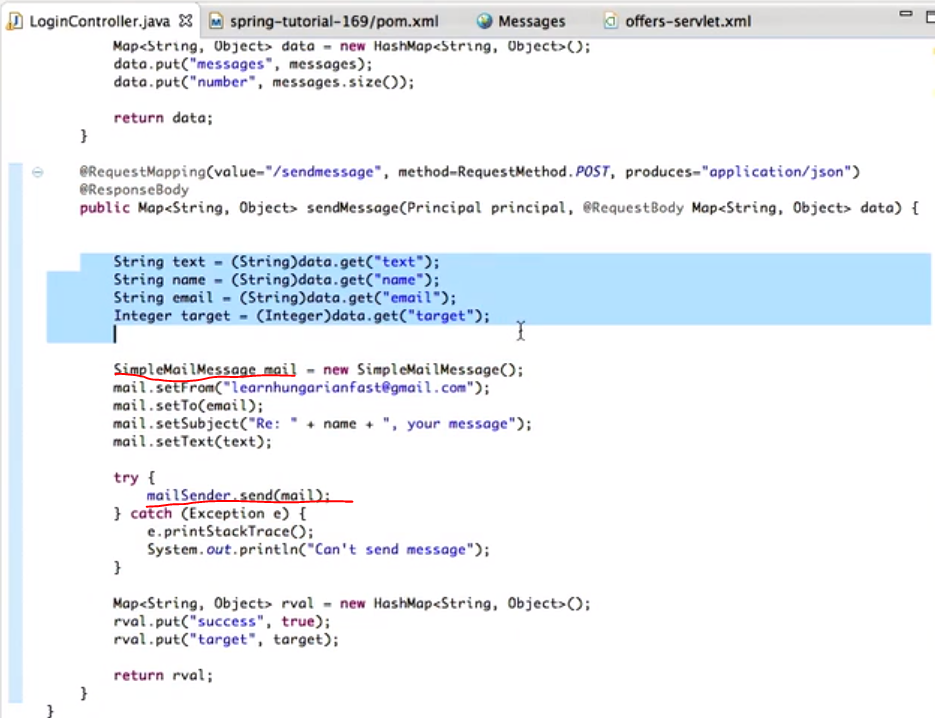
Spring In Action Part 3 Integration
Chapter 15 Working with remote services
when we talk about RPC (Remote Procedure Call) we are talking about SYNCHRONUS call, which means blocking execution in the calling code until the called procedure is complete.
sure, RPC is a model, and we have different way to implement it:

Regardless of which remoting model you choose, you’ll find that a common theme runs through Spring’s support for each model


however with spring the process is easier, you basically define a method with @Bean annotation and write this

this will do all the mentioned things before, (SpitterService is the service that we want to expose).
on the client side you write

we will not go into more details here.
Exposing remote services with Hessian and Burlap
1- another 2 protocols to handle the RPC
2- Hessian uses binary messages like RMI, however, the binary message is portable to languages other than Java, including PHP, Python, C++, and C#
3- Burlap is an XML-based remoting technology, which automatically makes it portable to any language that can parse XML
5- the difference between RMI and Hessian&Burlap is that Hessian&Burlap are HTTP-based, that is why you should define a dispatcher servlet for all .service urls

Using Spring’s HttpInvoker
now we have RMI, it doesn't use HTTP, however it users java serialization, and we have Hessian&Burlap, which uses http, however it has its own serialization technique
that is why we have HttpInvoker, it is http based and uses java serialization
also exporting and implementing HttpInvoker services are similar to other services before
HttpInvoker a remoting solution offered by the Spring Framework only. This means both the client and the service must be Spring-enabled applications
Publishing and consuming web services
spring uses JAX-WS for building web services, you will use annotations like @Webservice and @Webmethods.
we will not talk about this here, we will have another complete tutorial about webservice
Chapter 16 REST
another model which focuses on accessing resources, we know the stuff like @RequestMapping @ResponseBody ...
Chapter 17 Messaging in Spring
he talked about messaging in general, how it is asynchronus communication, and the types of messaging, point to point or publish subscribe.
in order to use messaging in spring
 this is a connection to ActiveMQ
then you define your Quere or Topic bean
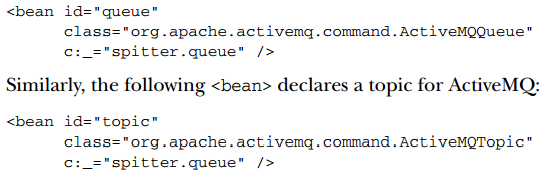 then you define a jmsTemplate

now you send a message like this


as you can see JmsOperations is the interface that JmsTemplate implements, and we use the send() method to send a message
in order to receive message from the bean

AMQP Advanced Messaging Queuing Protocol
this is another way of asynchronous messaging. The difference between AMQP and JMS:
1- JMS is an API, AMQP is a protocol
2- JMS is something related to Java, AMQP is platform and language independent
3- in JMS we have point-to-point and publish subscribe, in AMQP we have different messaging model
4- an example of a messaging system that implements AMQP is RabbitMQ
In AMQP the producer doesn't add the message to queue, actually the producer doesn't know if there is a queue or not, the producer communicate with a new layer called exchange:

exchange has 4 types of communication with a queue:
1- fanout: when the exchange receive a message it puts the message in all queue it has access to

2- direct: the exchange will check the message routing_key and put it in the queue that has the same key

3- Topic: here we use wildcard
 4- Header: here the exchange matches based on header

Spring can handle AMQP as well
we will not go into the code
Chapter 18 Messaging with Websocket and STOMP
Websocket, you know if you want to get information from the server you usually send an ajax request and pool the latest update.
Websocket is a way to open a socket between the browser and the server (actually between 2 applications) which allow them to communicate all the time, so if the server has something to tell the browser it can tell him directly, the browser doesnt have to keep asking
Websocket is light weight, fast, bi directional, it is part of HTML5, not all browsers support it.
Spring has full support of implementing websocket.
you have SOCKJS, for javascript socket development
we will not go into the code here,
STOMP: Websocket is too low level it is basically a TCP thing, SOMP is text-based protocol similar to HTTP, however STOMP is actually used when websocket is wanted.
So stomp is used when you want to use websocket and you dont want to write low level code.
STOMP is also used to connect to a message queue like activemq. ActriveMQ support websocket over STOMP.
Chapter 19: Sending Emails
to send emails you should use JavaMailSenderImpl

then you can write:

Chapter 20: Managing beans with JMX
JMX stands for Java Management Extensions, and is a facility to allow for remote clients to connect to a JVM, and manage/monitor running applications in that JVM.
in order to be able to manage your beans you should define something called MBEAN
1- define an interface with MBean at the end of its namge
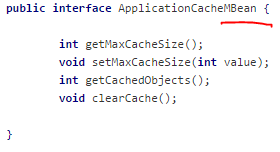
now you implement this interface


now you should write this in your main

now you can use JConsole to monitor the bean,
you should add this to the application JVM argument:
when we talk about RPC (Remote Procedure Call) we are talking about SYNCHRONUS call, which means blocking execution in the calling code until the called procedure is complete.
sure, RPC is a model, and we have different way to implement it:

Regardless of which remoting model you choose, you’ll find that a common theme runs through Spring’s support for each model

so spring will create a proxy for each service and the client communicate with the Proxy
Remote Method Invocation
1- it came as alternative to CORBA
2- RMI uses binary messages to do the communication
2- in general, building a RMI should go throw the following steps

however with spring the process is easier, you basically define a method with @Bean annotation and write this
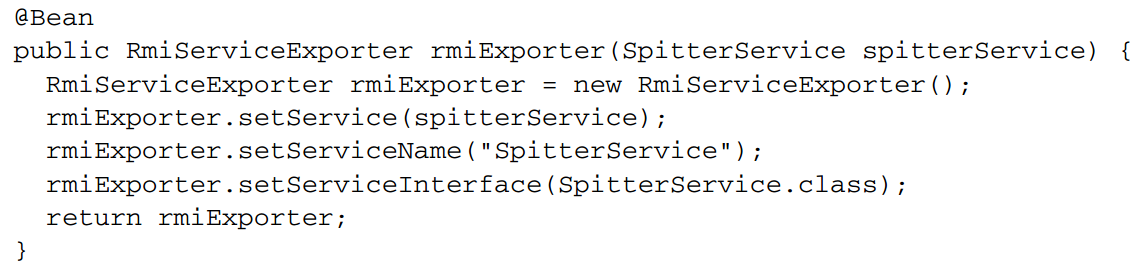
this will do all the mentioned things before, (SpitterService is the service that we want to expose).
on the client side you write

we will not go into more details here.
Exposing remote services with Hessian and Burlap
1- another 2 protocols to handle the RPC
2- Hessian uses binary messages like RMI, however, the binary message is portable to languages other than Java, including PHP, Python, C++, and C#
3- Burlap is an XML-based remoting technology, which automatically makes it portable to any language that can parse XML
5- the difference between RMI and Hessian&Burlap is that Hessian&Burlap are HTTP-based, that is why you should define a dispatcher servlet for all .service urls
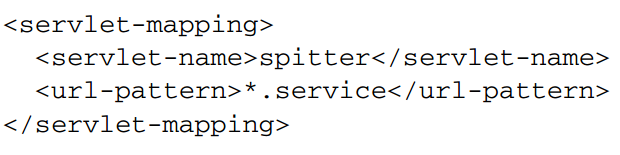
Using Spring’s HttpInvoker
now we have RMI, it doesn't use HTTP, however it users java serialization, and we have Hessian&Burlap, which uses http, however it has its own serialization technique
that is why we have HttpInvoker, it is http based and uses java serialization
also exporting and implementing HttpInvoker services are similar to other services before
HttpInvoker a remoting solution offered by the Spring Framework only. This means both the client and the service must be Spring-enabled applications
Publishing and consuming web services
spring uses JAX-WS for building web services, you will use annotations like @Webservice and @Webmethods.
we will not talk about this here, we will have another complete tutorial about webservice
Chapter 16 REST
another model which focuses on accessing resources, we know the stuff like @RequestMapping @ResponseBody ...
Chapter 17 Messaging in Spring
he talked about messaging in general, how it is asynchronus communication, and the types of messaging, point to point or publish subscribe.
in order to use messaging in spring

then you define your Quere or Topic bean


now you send a message like this


as you can see JmsOperations is the interface that JmsTemplate implements, and we use the send() method to send a message
in order to receive message from the bean

AMQP Advanced Messaging Queuing Protocol
this is another way of asynchronous messaging. The difference between AMQP and JMS:
1- JMS is an API, AMQP is a protocol
2- JMS is something related to Java, AMQP is platform and language independent
3- in JMS we have point-to-point and publish subscribe, in AMQP we have different messaging model
4- an example of a messaging system that implements AMQP is RabbitMQ
In AMQP the producer doesn't add the message to queue, actually the producer doesn't know if there is a queue or not, the producer communicate with a new layer called exchange:

exchange has 4 types of communication with a queue:
1- fanout: when the exchange receive a message it puts the message in all queue it has access to
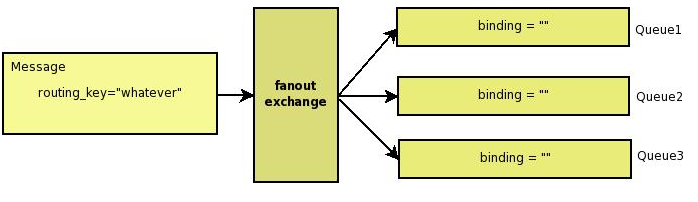
2- direct: the exchange will check the message routing_key and put it in the queue that has the same key

3- Topic: here we use wildcard


Spring can handle AMQP as well
we will not go into the code
Chapter 18 Messaging with Websocket and STOMP
Websocket, you know if you want to get information from the server you usually send an ajax request and pool the latest update.
Websocket is a way to open a socket between the browser and the server (actually between 2 applications) which allow them to communicate all the time, so if the server has something to tell the browser it can tell him directly, the browser doesnt have to keep asking
Websocket is light weight, fast, bi directional, it is part of HTML5, not all browsers support it.
Spring has full support of implementing websocket.
you have SOCKJS, for javascript socket development
we will not go into the code here,
STOMP: Websocket is too low level it is basically a TCP thing, SOMP is text-based protocol similar to HTTP, however STOMP is actually used when websocket is wanted.
So stomp is used when you want to use websocket and you dont want to write low level code.
STOMP is also used to connect to a message queue like activemq. ActriveMQ support websocket over STOMP.
Chapter 19: Sending Emails
to send emails you should use JavaMailSenderImpl

then you can write:

Chapter 20: Managing beans with JMX
JMX stands for Java Management Extensions, and is a facility to allow for remote clients to connect to a JVM, and manage/monitor running applications in that JVM.
in order to be able to manage your beans you should define something called MBEAN
1- define an interface with MBean at the end of its namge

now you implement this interface

now you should write this in your main

now you can use JConsole to monitor the bean,
you should add this to the application JVM argument:
-Dcom.sun.management.jmxremote
Chapter 21: Spring Deployment with Spring BootSpring Boot Starter: you can aggregate dependencies together into a single dependency, for example sometimes you need these dependenceis in your projectcompile("org.springframework:spring-web:4.0.6.RELEASE")compile("org.springframework:spring-webmvc:4.0.6.RELEASE") compile("com.fasterxml.jackson.core:jackson-databind:2.2.2") compile("org.springframework:spring-jdbc:4.0.6.RELEASE")compile("org.springframework:spring-tx:4.0.6.RELEASE")compile("com.h2database:h2:1.3.174")compile("org.thymeleaf:thymeleaf-spring4:2.1.2.RELEASE")with spring boot starter some of these dependencies are compiled together so you need justcompile("org.springframework.boot:spring-boot-starter-web: 1.1.4.RELEASE") compile("org.springframework.boot:spring-boot-starter-jdbc: 1.1.4.RELEASE") compile("com.h2database:h2:1.3.174")compile("org.thymeleaf:thymeleaf-spring4:2.1.2.RELEASE")Spring Boot autoconfiguration: it cuts down on the amount of Spring configuration, for example you need these beans to configure Thymeleaf ( a template engine similar to velocity ) a ThymeleafViewResolver, a SpringTemplateEngine, and a TemplateResolver.wit spring boot autoconfiguration, you just add Thymeleaf in the class path and spring will know automatically that it should add these beans.The Spring Boot CLI: here you can use groovey in configuration.